End to end ML pipeline using multiple open source tools. Create a pipeline for model training and an application to use the AI model for generating prediction.
End to end ML pipeline using multiple open source tools and AWS
- Create a virtual environment
- Create Data Science project structure
- Create a github repository
- Download Data
- DVC for data version control
- Source code
- Create training pipeline
- Run pipeline
- Web app with Flask
- Unit test using Pytest
- Create an app in Heroku
- Create CI-CD pipeline using Github Actions
- Create a “Procfile” for Heroku to start the process
- Push code to Github
- Check the App in Heroku provided Domain
- Run some tests with Numeric and Non-numeric data
- Model monitoring with EvidentlyAI
We are going to create a ML Pipeline using various tools. I am recreating this reference
MLOps, which is also called Machine Learning DevOps, is a collection of a few different pipelines. There are three major ingredients of a ML pipeline - Data, Model and Application. The pipelines automate various interactions between data, model and applications to make the entire ML pipeline work.
- The first pipeline is the data pipeline. Data pipeline takes data from source and prepares the data for ML Engineering use.
- The second pipeline trains a starter model with the ingested data to create a refined model.
- The third pipeline deploys the refined model in a web or batch environment for making inferences.
Applications are written to prepare data, train models and deploy models.
In this demo, there are few major parts. The first one is a DVC based pipeline to train a model. DVC is an open source Data version control tool based on git. It is a handy tool where actions are based on change in data or application. It allows tracking change in a file/directory.
The second part is a github action CICD pipeline. This to automate push application changes to the cloud, in this case Heroku.
In the third part, EvidentlyAI is used to analyze drifts of various kinds such as data and target drift. It is possible to trigger an automated retraining based on a predetermined drift threshold, but it is not covered in this post.
The github repo for this demo is here.
Create a virtual environment
Create a virtual environment using Conda and activate the virtual environment. To install Conda in your system follow this link
conda create -n mlops_pipeline python=3.7 -y
conda activate mlops_pipeline
Create Data Science project structure
I will use the cookiecutter data science project structure to organize my project.
pip install cookiecutter
cookiecutter https://github.com/drivendata/cookiecutter-data-science
Note: At the time of writing cookiecutter is moving to v2
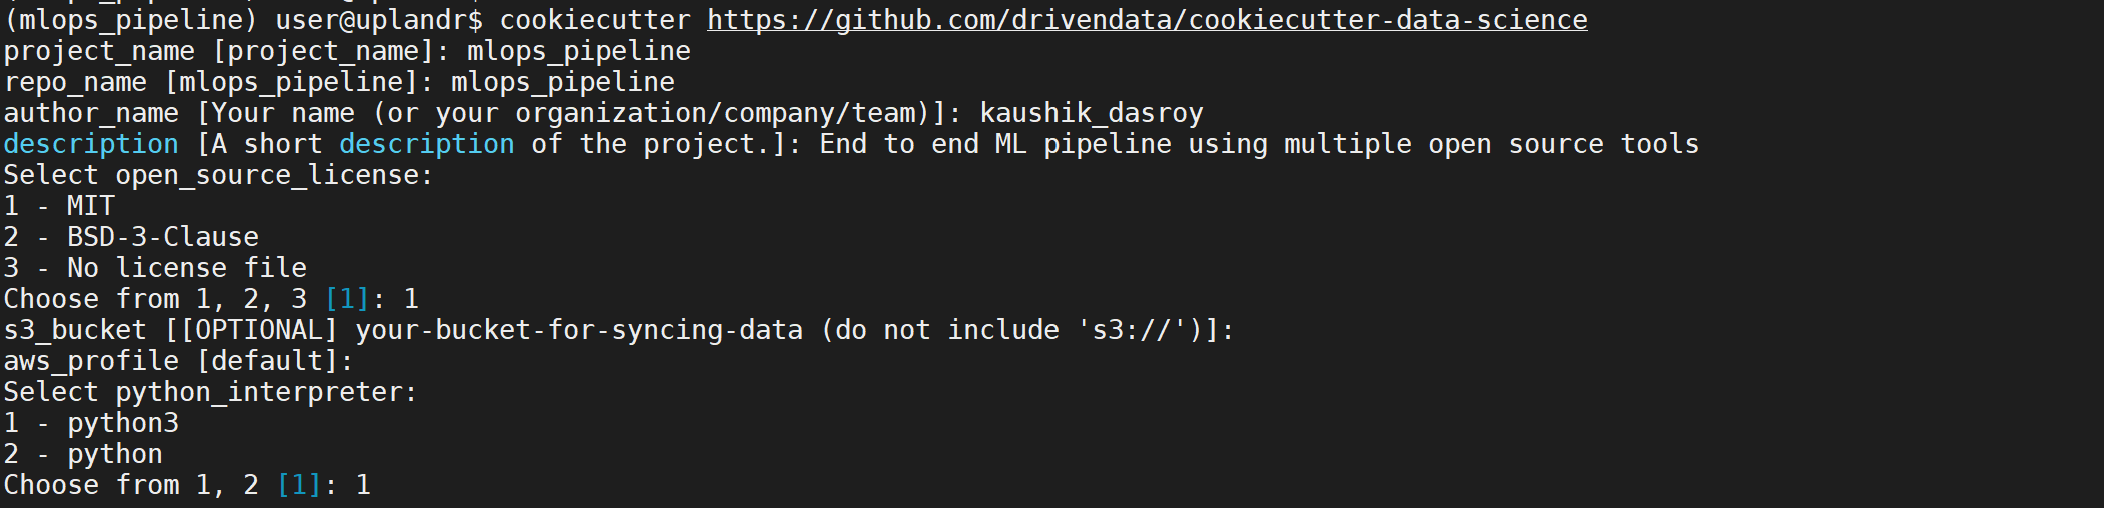
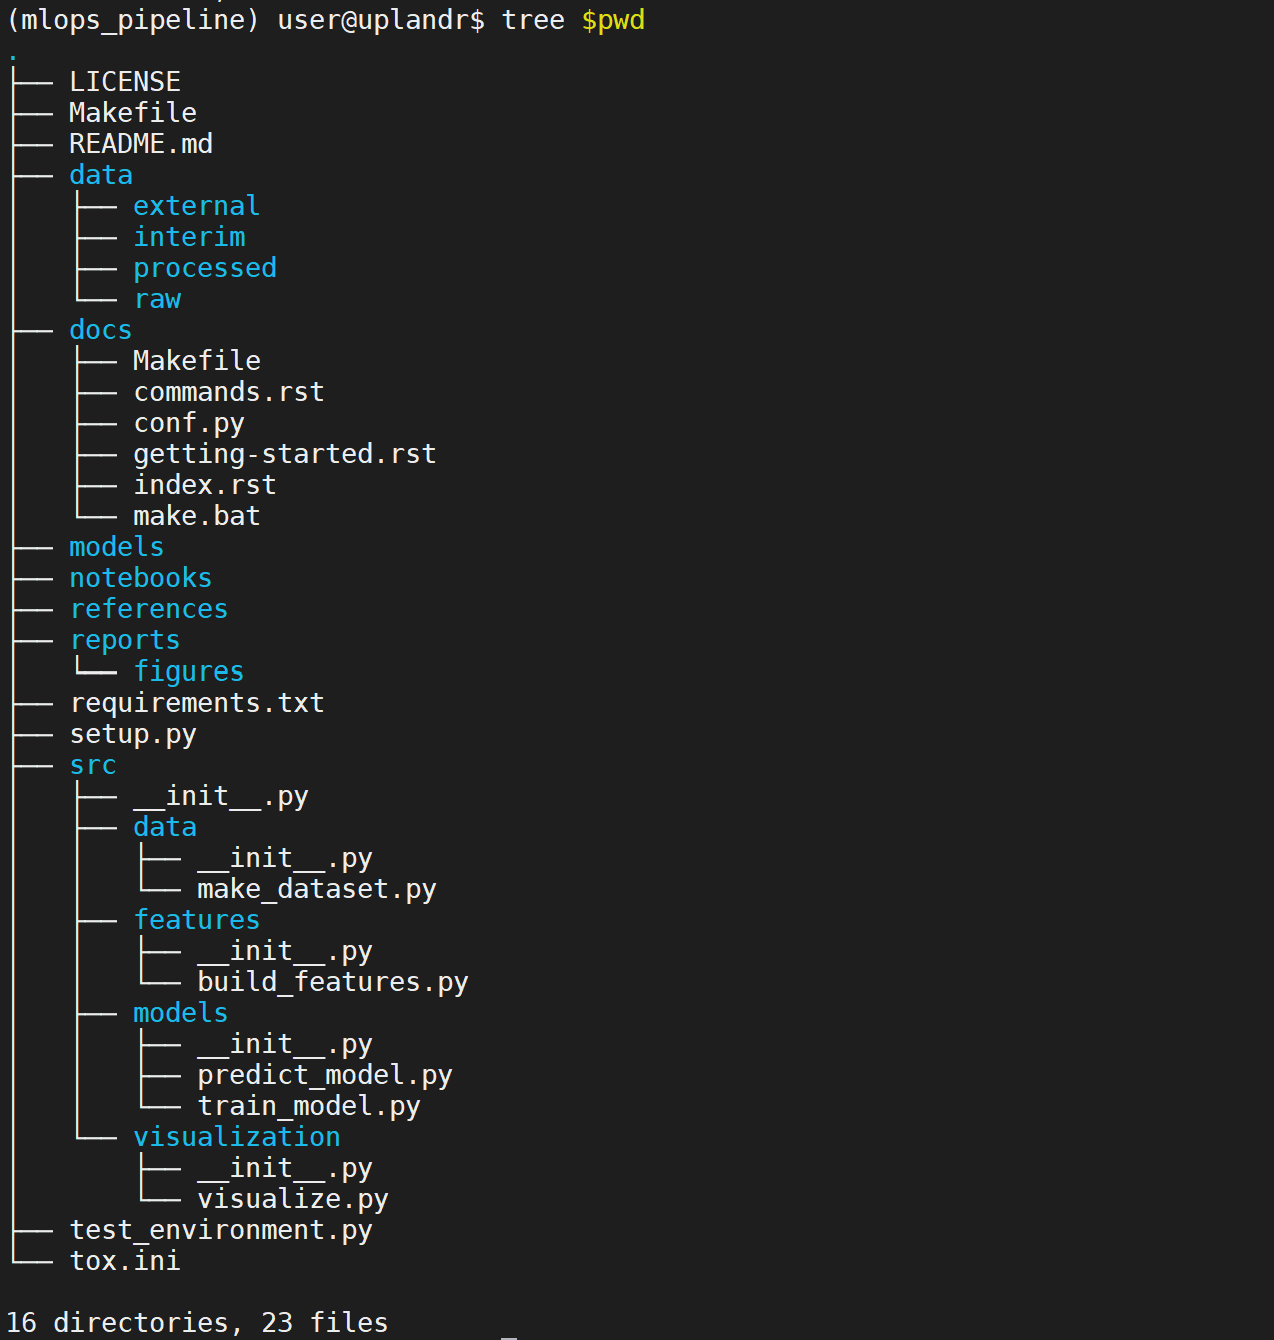
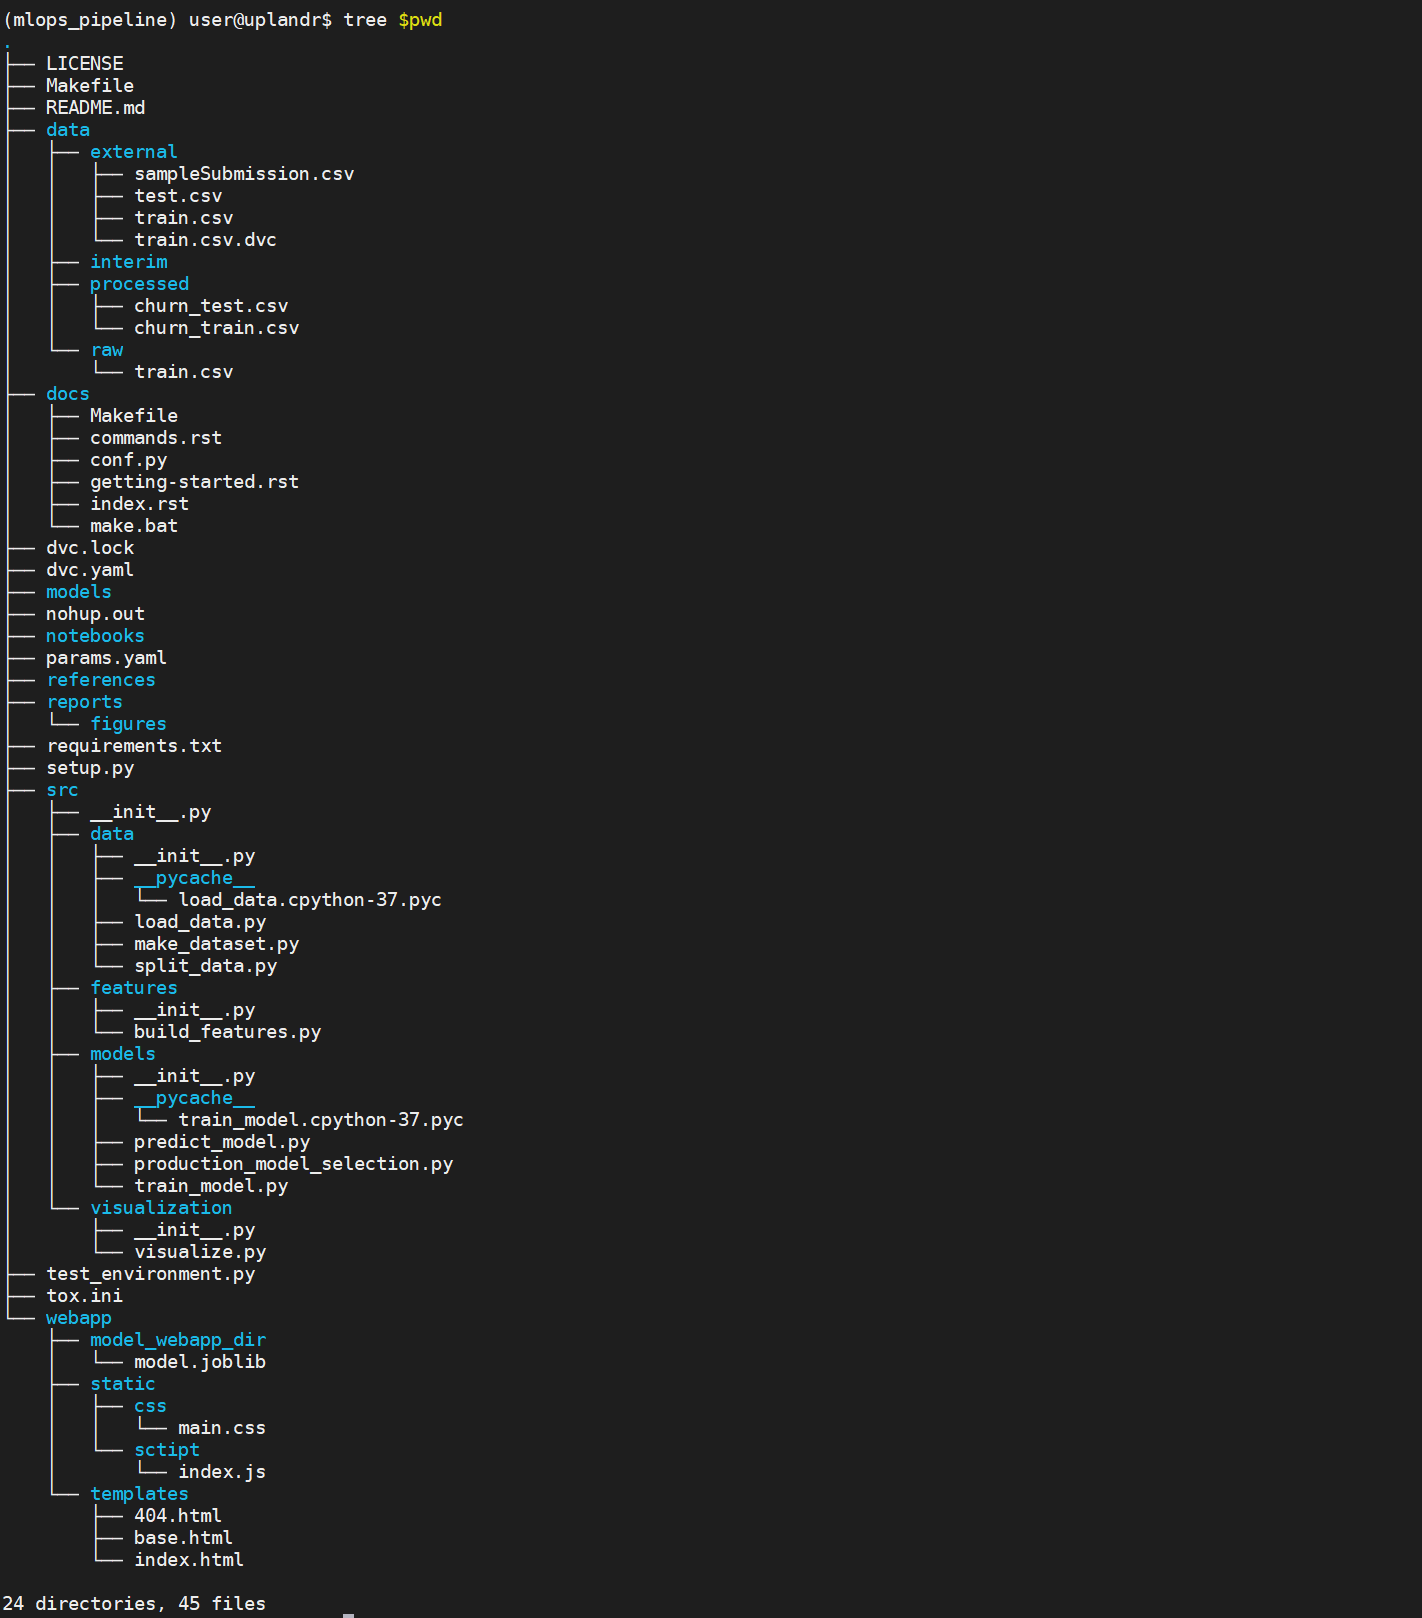
The project structure will be created.

Create a github repository
Create a github repository and push the current project to the repository. I am doing all the development in the main branch.
git init
git add .
git commit -m "first commit"
git branch -M main
git remote add origin https://github.com/kaushikdasroy/mlops_pipeline.git
git push -u origin main
Download Data
I will train a simplistic model to predict customer churn. My focus here is to demo a ML Pipeline and a simple model will be sufficient for that purpose.
I will train the model using data from a Kaggle competition.
After login, accept the competition rules in Kaggle. Use the following command to download the [data] (https://www.kaggle.com/competitions/customer-churn-prediction-2020/data) in data/external location of the project structure.
You will also need to place kaggle.json file in ~/.kaggle
pip install kaggle
kaggle competitions download -c customer-churn-prediction-2020
There are few folders in the /data folder.
external: External files (ex. train.csv from Kaggle)
raw: Raw data for this project
Processed: Processed files using the raw files
DVC for data version control
Comment /data/ in the .gitignore file as we are going to use DVC to track data version

Install DVC and initialize it to track the data folder. I will use git for code version control and DVC for data version control.
pip install dvc
dvc init
git commit -m "Initialize DVC"
dvc add data/external/train.csv
This will create a separate .dvcignore file.
A file train.csv.dvc will be created inside /data/external as the train.csv getting versioned.

Source code
There are 4 folders namely data, features, models and visualization inside the /src folder. params.yaml file needs to be created inside the mlops_pipeline folder which will manage all project level configurations.
Following python scripts are placed in the data and models folders.
data: Data loading related python scripts (load_data.py, split_data.py)
models: Model-related python scripts (train_model.py, production_model_selection.py, model_monitor.py)
Create the params.yaml file in the mlops_pipeline folder to add the project configurations as below.
external_data_config:
  external_data_csv: data/external/train.csv

raw_data_config:
  raw_data_csv: data/raw/train.csv
  model_var: ['churn','number_vmail_messages','total_day_calls','total_eve_minutes','total_eve_charge','total_intl_minutes','number_customer_service_calls']
  train_test_split_ratio: 0.2
  target: churn
  random_state: 111
  new_train_data_csv: data/raw/train_new.csv

processed_data_config:
  train_data_csv: data/processed/churn_train.csv
  test_data_csv:  data/processed/churn_test.csv

mlflow_config:
  artifacts_dir: artifacts
  experiment_name: model_iteration1
  run_name: random_forest
  registered_model_name: random_forest_model
  remote_server_uri: http://localhost:1234

random_forest:
  max_depth: 10
  n_estimators: 30

model_dir: models/model.joblib

model_webapp_dir: webapp/model_webapp_dir/model.joblib

model_monitor:
  target_col_name: target
  monitor_dashboard_html: reports/data_and_target_drift_dashboard.html
Create a load_data.py file in the src/data folder. This script is to load an external train.csv file to the data/raw folder.
import yaml
import argparse
import numpy as np
import pandas as pd

def read_params(config_path):
    """
    read parameters from the params.yaml file
    input: params.yaml location
    output: parameters as dictionary
    """
    with open(config_path) as yaml_file:
        config = yaml.safe_load(yaml_file)
    return config

def load_data(data_path,model_var):
    """
    load csv dataset from given path
    input: csv path
    output:pandas dataframe
    note: Only 6 variables are used in this model building stage for the simplicity.
    """
    df = pd.read_csv(data_path, sep=",", encoding='utf-8')
    df=df[model_var]
    return df

def load_raw_data(config_path):
    """
    load data from external location(data/external) to the raw folder(data/raw) with train and teting dataset
    input: config_path
    output: save train file in data/raw folder
    """
    config=read_params(config_path)
    external_data_path=config["external_data_config"]["external_data_csv"]
    raw_data_path=config["raw_data_config"]["raw_data_csv"]
    model_var=config["raw_data_config"]["model_var"]

    df=load_data(external_data_path,model_var)
    df.to_csv(raw_data_path,index=False)

if __name__ == "__main__":
    args = argparse.ArgumentParser()
    args.add_argument("--config", default="params.yaml")
    parsed_args = args.parse_args()
    load_raw_data(config_path=parsed_args.config)
Create a split_data.py script in the src/data folder. Purpose of this script is to split the train.csv file in the raw/data folder into churn_train.csv and churn_test.csv files in the data/processed folder.
import os
import argparse
import pandas as pd
from load_data import read_params
from sklearn.model_selection import train_test_split

def split_data(df,train_data_path,test_data_path,split_ratio,random_state):
    train, test = train_test_split(df, test_size=split_ratio, random_state=random_state)
    train.to_csv(train_data_path, sep=",", index=False, encoding="utf-8")
    test.to_csv(test_data_path, sep=",", index=False, encoding="utf-8")

def split_and_saved_data(config_path):
    """
    split the train dataset(data/raw) and save it in the data/processed folder
    input: config path
    output: save splitted files in output folder
    """
    config = read_params(config_path)
    raw_data_path = config["raw_data_config"]["raw_data_csv"]
    test_data_path = config["processed_data_config"]["test_data_csv"]
    train_data_path = config["processed_data_config"]["train_data_csv"]
    split_ratio = config["raw_data_config"]["train_test_split_ratio"]
    random_state = config["raw_data_config"]["random_state"]
    raw_df=pd.read_csv(raw_data_path)
    split_data(raw_df,train_data_path,test_data_path,split_ratio,random_state)

if __name__=="__main__":
    args = argparse.ArgumentParser()
    args.add_argument("--config", default="params.yaml")
    parsed_args = args.parse_args()
    split_and_saved_data(config_path=parsed_args.config)
Model training script train_model.py is at src/models directory.
import json
import yaml
import joblib
import mlflow
import argparse
import numpy as np
import pandas as pd
from urllib.parse import urlparse
from sklearn.ensemble import RandomForestClassifier
from sklearn.metrics import f1_score,recall_score,accuracy_score,precision_score,confusion_matrix,classification_report

def read_params(config_path):
    """
    read parameters from the params.yaml file
    input: params.yaml location
    output: parameters as dictionary
    """
    with open(config_path) as yaml_file:
        config = yaml.safe_load(yaml_file)
    return config

def accuracymeasures(y_test,predictions,avg_method):
    accuracy = accuracy_score(y_test, predictions)
    precision = precision_score(y_test, predictions, average=avg_method)
    recall = recall_score(y_test, predictions, average=avg_method)
    f1score = f1_score(y_test, predictions, average=avg_method)
    target_names = ['0','1']
    print("Classification report")
    print("---------------------","\n")
    print(classification_report(y_test, predictions,target_names=target_names),"\n")
    print("Confusion Matrix")
    print("---------------------","\n")
    print(confusion_matrix(y_test, predictions),"\n")

    print("Accuracy Measures")
    print("---------------------","\n")
    print("Accuracy: ", accuracy)
    print("Precision: ", precision)
    print("Recall: ", recall)
    print("F1 Score: ", f1score)

    return accuracy,precision,recall,f1score

def get_feat_and_target(df,target):
    """
    Get features and target variables seperately from given dataframe and target
    input: dataframe and target column
    output: two dataframes for x and y
    """
    x=df.drop(target,axis=1)
    y=df[[target]]
    return x,y

def train_and_evaluate(config_path):
    config = read_params(config_path)
    train_data_path = config["processed_data_config"]["train_data_csv"]
    test_data_path = config["processed_data_config"]["test_data_csv"]
    target = config["raw_data_config"]["target"]
    max_depth=config["random_forest"]["max_depth"]
    n_estimators=config["random_forest"]["n_estimators"]

    train = pd.read_csv(train_data_path, sep=",")
    test = pd.read_csv(test_data_path, sep=",")
    train_x,train_y=get_feat_and_target(train,target)
    test_x,test_y=get_feat_and_target(test,target)

################### MLFLOW ###############################
    mlflow_config = config["mlflow_config"]
    remote_server_uri = mlflow_config["remote_server_uri"]

    mlflow.set_tracking_uri(remote_server_uri)
    mlflow.set_experiment(mlflow_config["experiment_name"])

    with mlflow.start_run(run_name=mlflow_config["run_name"]) as mlops_run:
        model = RandomForestClassifier(max_depth=max_depth,n_estimators=n_estimators)
        model.fit(train_x, train_y)
        y_pred = model.predict(test_x)
        accuracy,precision,recall,f1score = accuracymeasures(test_y,y_pred,'weighted')

        mlflow.log_param("max_depth",max_depth)
        mlflow.log_param("n_estimators", n_estimators)

        mlflow.log_metric("accuracy", accuracy)
        mlflow.log_metric("precision", precision)
        mlflow.log_metric("recall", recall)
        mlflow.log_metric("f1_score", f1score)

        tracking_url_type_store = urlparse(mlflow.get_artifact_uri()).scheme

        if tracking_url_type_store != "file":
            mlflow.sklearn.log_model(
                model,
                "model",
                registered_model_name=mlflow_config["registered_model_name"])
        else:
            mlflow.sklearn.load_model(model, "model")

if __name__=="__main__":
    args = argparse.ArgumentParser()
    args.add_argument("--config", default="params.yaml")
    parsed_args = args.parse_args()
    train_and_evaluate(config_path=parsed_args.config)
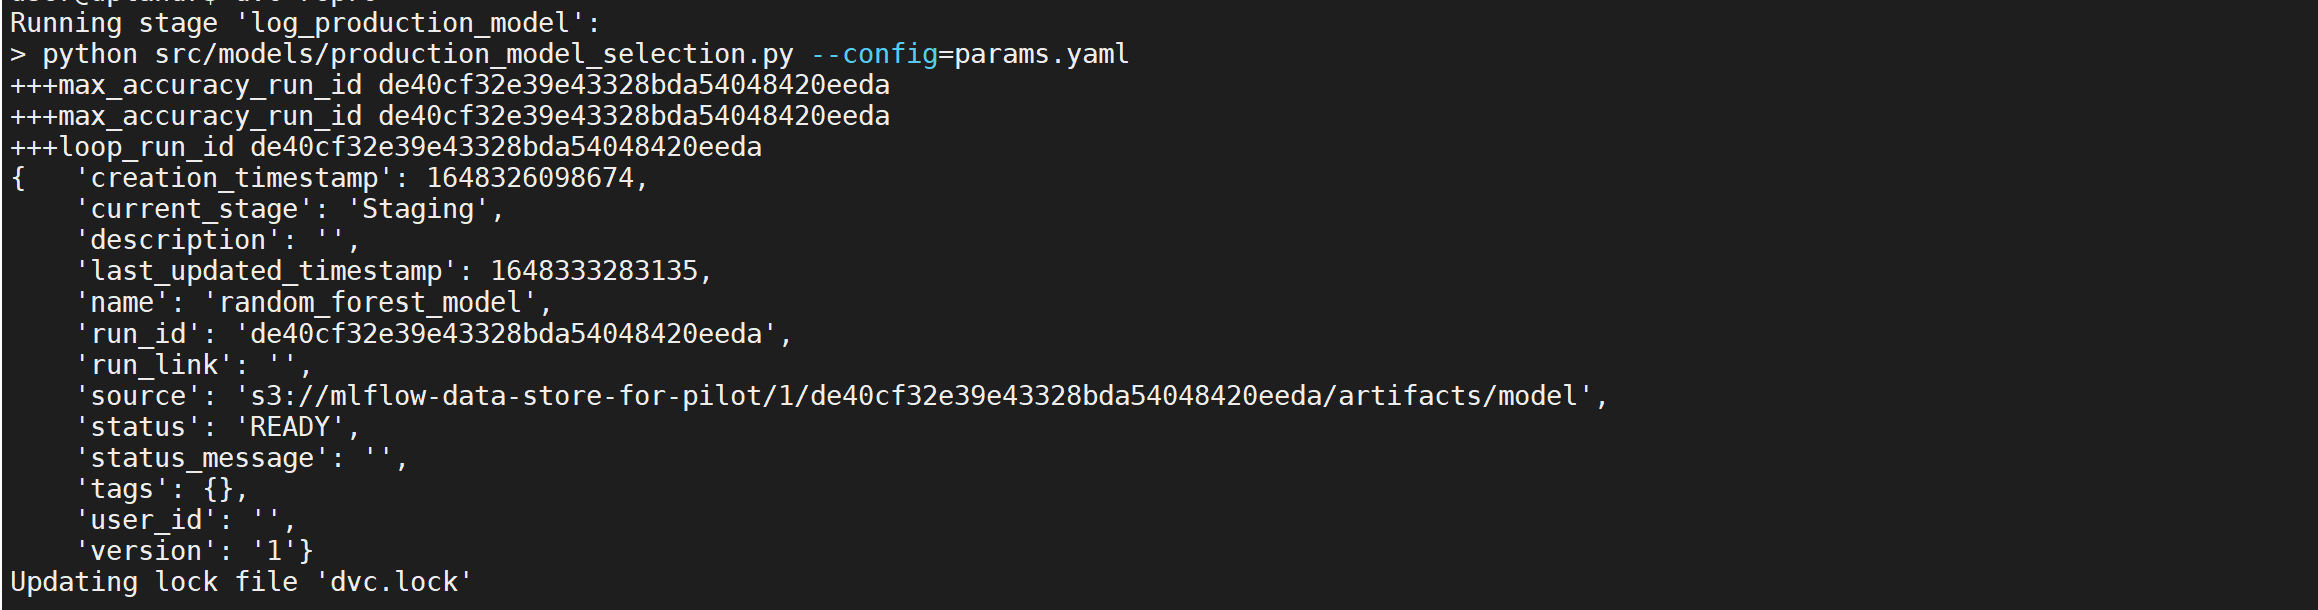
The script production_model_selection.py will select the best model from the model registry and save it in the model directory. The best model is selected using the accuracy score.
import joblib
import mlflow
import argparse
from pprint import pprint
from train_model import read_params
from mlflow.tracking import MlflowClient

def log_production_model(config_path):
    config = read_params(config_path)
    mlflow_config = config["mlflow_config"]
    model_name = mlflow_config["registered_model_name"]
    model_dir = config["model_dir"]
    remote_server_uri = mlflow_config["remote_server_uri"]

    mlflow.set_tracking_uri(remote_server_uri)
    runs = mlflow.search_runs(experiment_ids=1)
    max_accuracy = max(runs["metrics.accuracy"])
    max_accuracy_run_id = list(runs[runs["metrics.accuracy"] == max_accuracy]["run_id"])[0]

    client = MlflowClient()
    for mv in client.search_model_versions(f"name='{model_name}'"):
        mv = dict(mv)

        if mv["run_id"] == max_accuracy_run_id:
            current_version = mv["version"]
            logged_model = mv["source"]
            pprint(mv, indent=4)
            client.transition_model_version_stage(
                name=model_name,
                version=current_version,
                stage="Production"
            )
        else:
            current_version = mv["version"]
            client.transition_model_version_stage(
                name=model_name,
                version=current_version,
                stage="Staging"
            )

    loaded_model = mlflow.pyfunc.load_model(logged_model)
    joblib.dump(loaded_model, model_dir)

if __name__ == '__main__':
    args = argparse.ArgumentParser()
    args.add_argument("--config", default="params.yaml")
    parsed_args = args.parse_args()
    data = log_production_model(config_path=parsed_args.config)
Create training pipeline
A DVC pipeline will be created to execute the model. First lets create a dvc.yaml file inside mlops_pipeline directory.
stages:
  raw_dataset_creation:
    cmd: python src/data/load_data.py --config=params.yaml
    deps:
    - src/data/load_data.py
    - data/external/train.csv
    outs:
    - data/raw/train.csv

  split_data:
    cmd: python src/data/split_data.py --config=params.yaml
    deps:
    - src/data/split_data.py
    - data/raw/train.csv
    outs:
    - data/processed/churn_train.csv
    - data/processed/churn_test.csv

  model_train:
    cmd: python src/models/train_model.py --config=params.yaml
    deps:
    - data/processed/churn_train.csv
    - data/processed/churn_test.csv
    - src/models/train_model.py
    params:
    - random_forest.max_depth
    - random_forest.n_estimators

  log_production_model:
    cmd: python src/models/production_model_selection.py --config=params.yaml
    deps:
    - src/models/production_model_selection.py
    params:
    - random_forest.max_depth
    - random_forest.n_estimators
    outs:
    - models/model.joblib
Run pipeline
First start the mlflow tracking. I will use an AWS postgresql RDS database along with AWS S3 to start the mlflow server. Use this post as a guide to start mlflow on AWS.
Install aws cli and run aws configuration from the EC2 environment.
sudo apt  install awscli
aws configuration
Provide AWS access key and secret from AWS IAM console. Please check here for detailed steps.
Also, change the params.yaml to reflect correct MLFLOW tracking URI
Run DVC repro to start the pipeline. DVC pipeline only executes the steps which are gone through some changes.
dvc repro

The pipeline will train a new model if we change any of the dependent parameters in the model_train stage. If we change max_depth and n_estimators values in the param.yaml file and rerun dvc repro a new run will be logged with metrics.
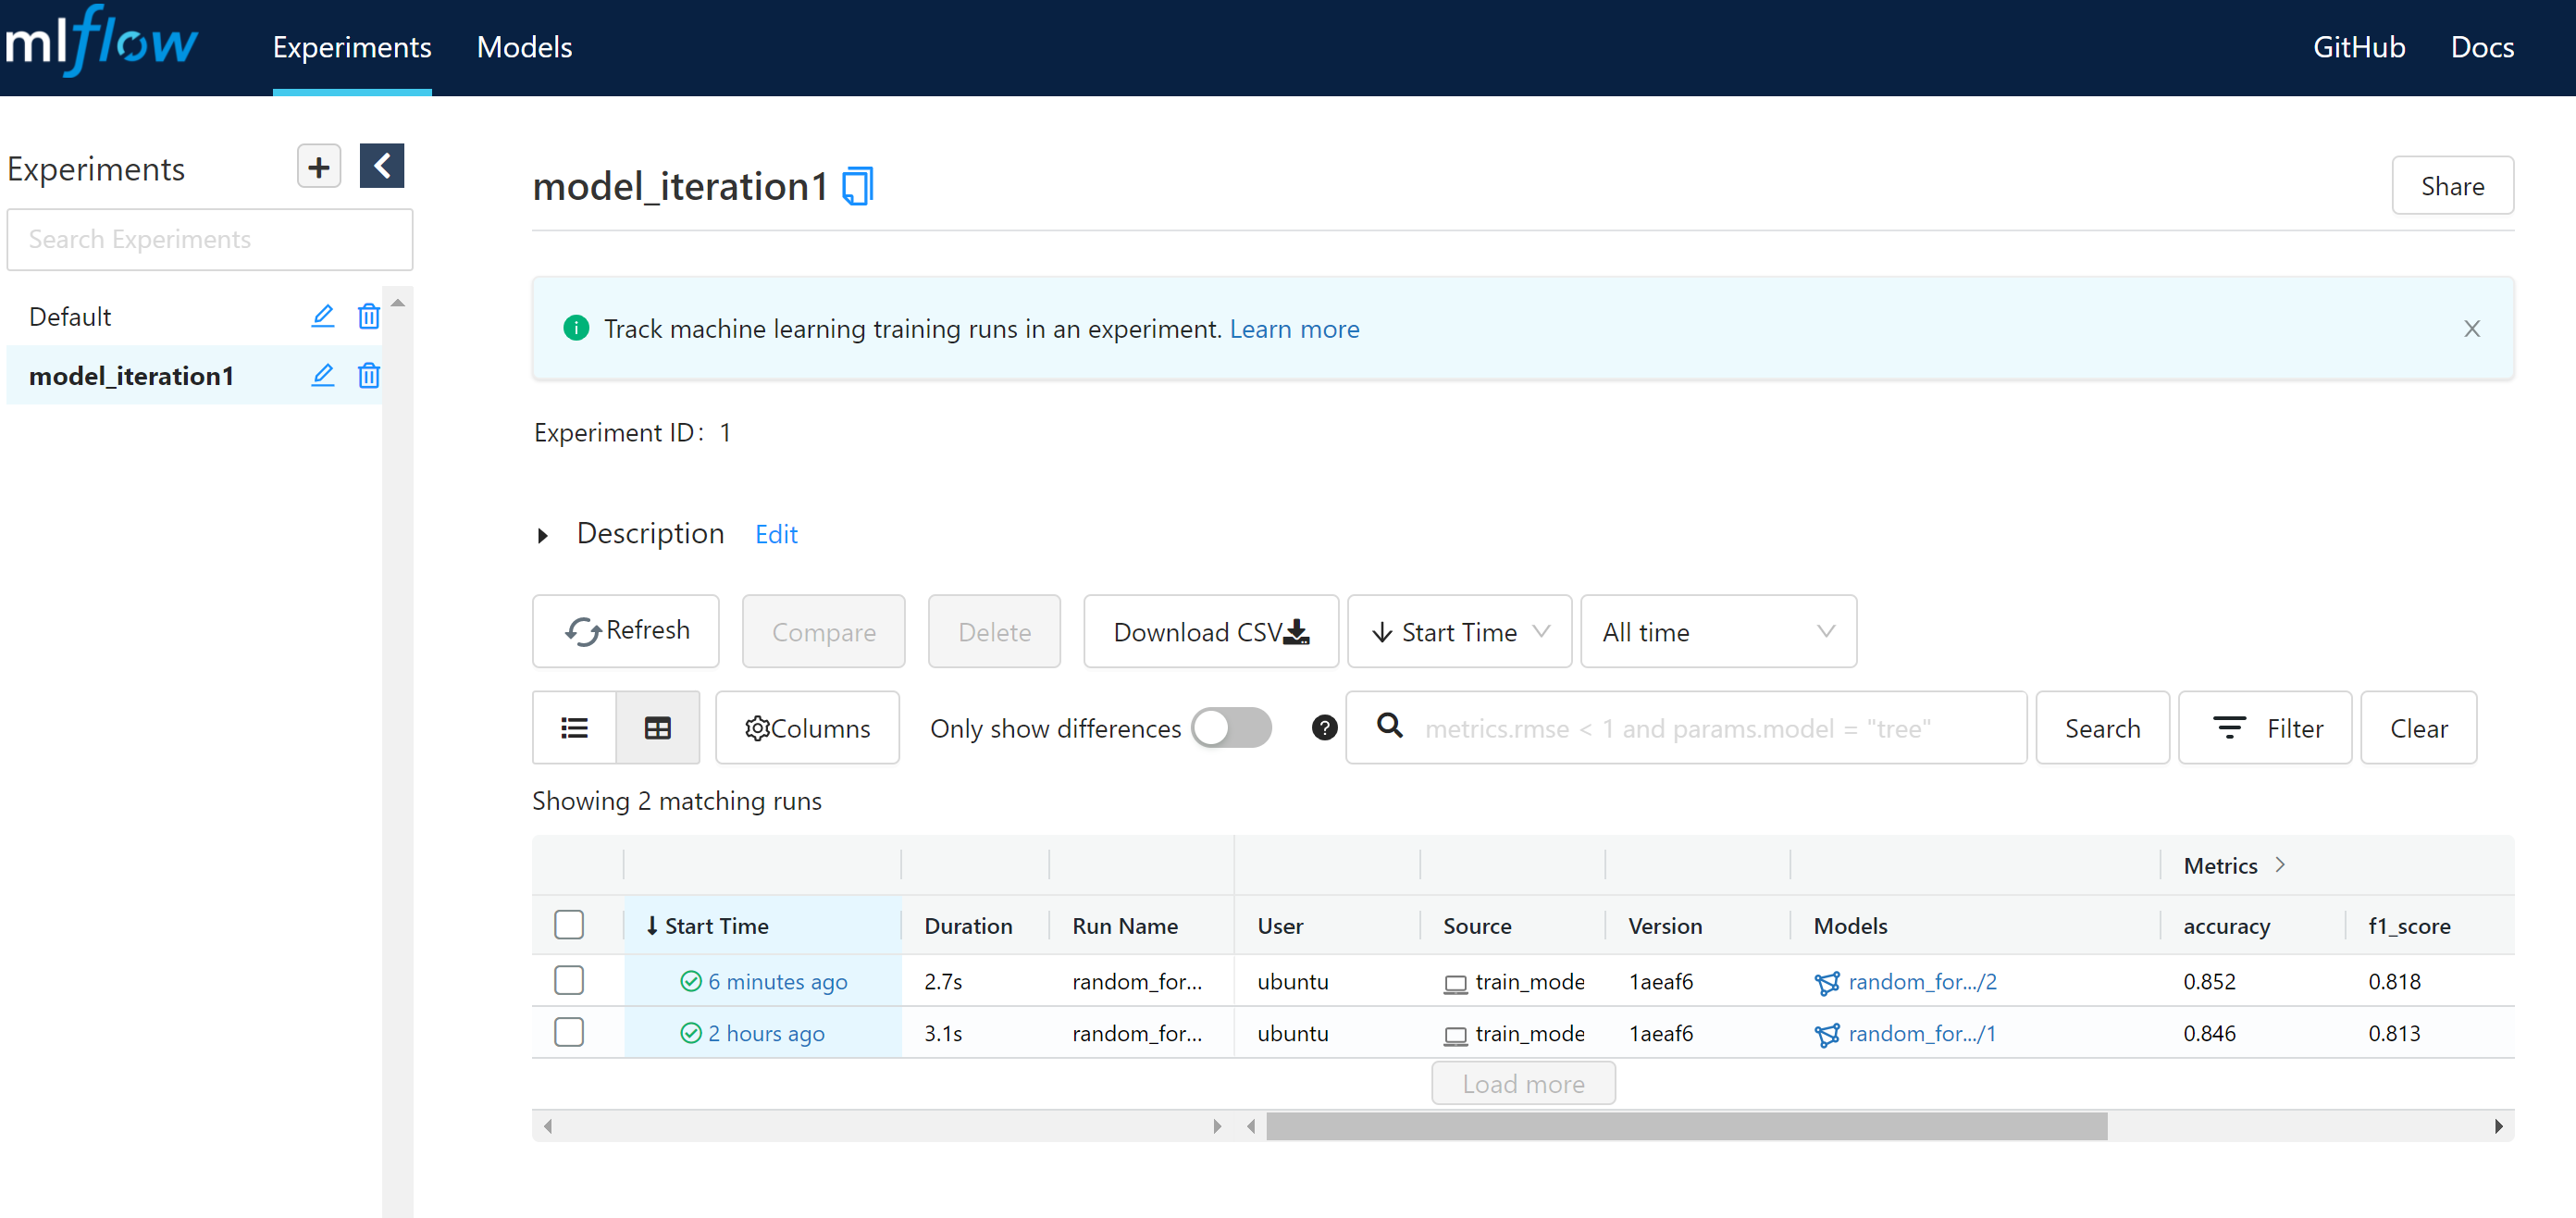
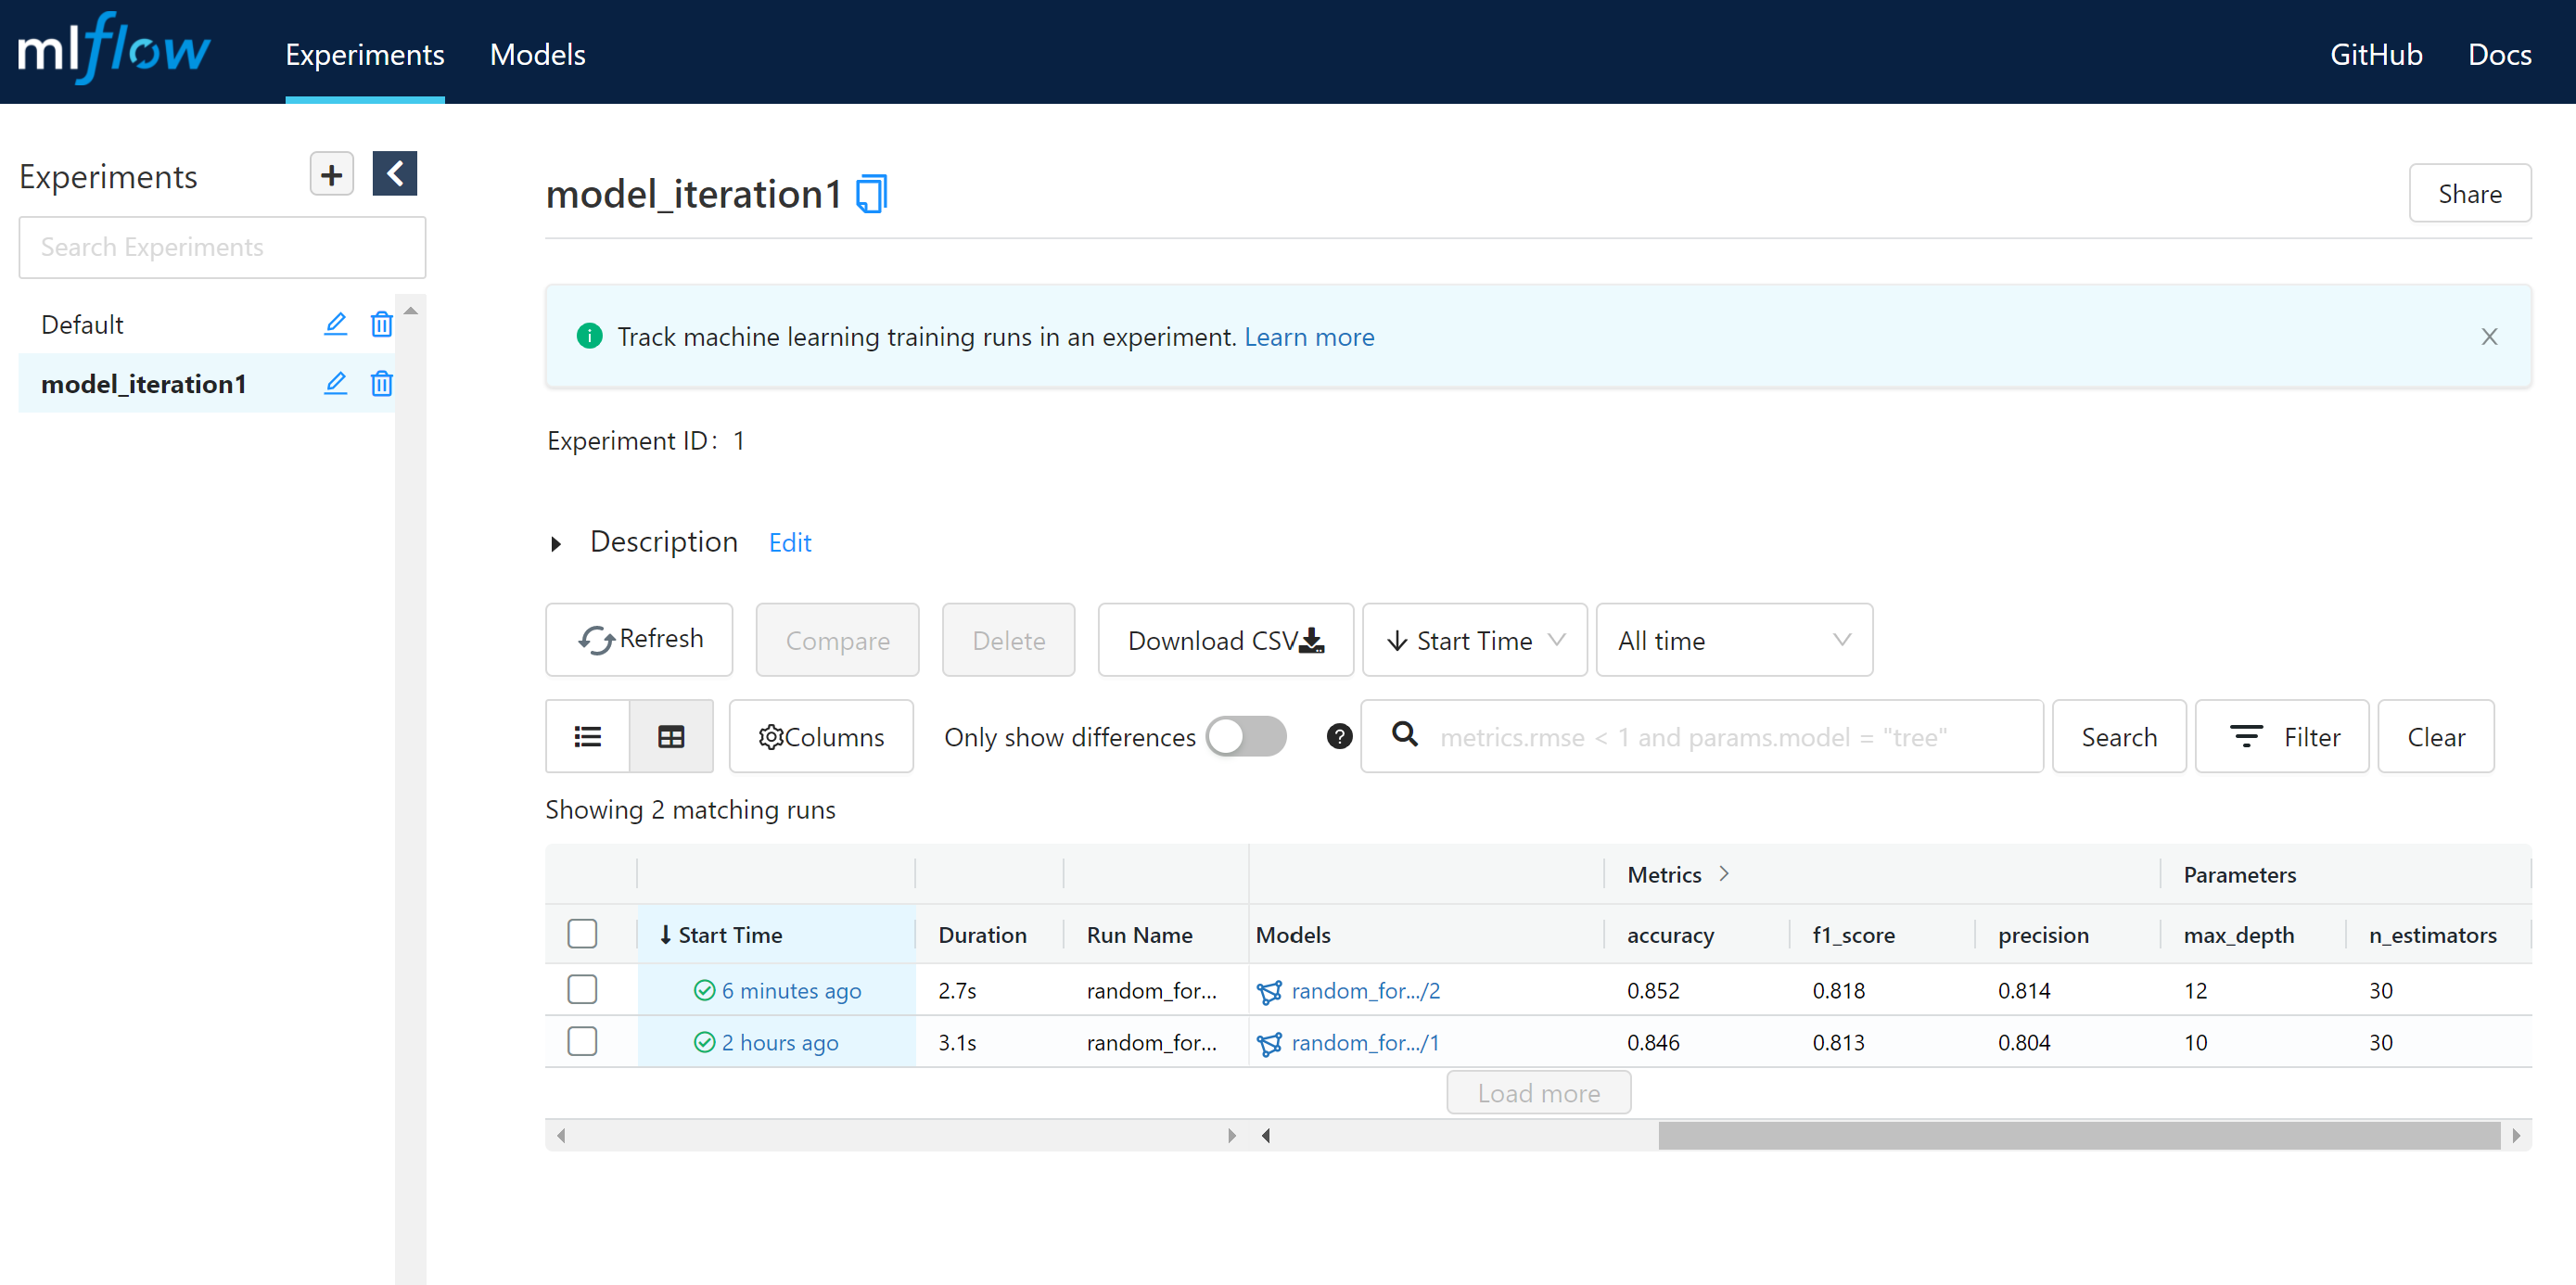
The model is stored in the models folder.

Web app with Flask
Flask is a web framework for python. This is a simple framework for exposing models for consumption over the web. In our example, we will enter the feature values on a web page and the model will predict churn or not.
Create a webapp folder and put required CSS, HTML, Javascript files inside the folder. Get the files from here. Move the model file model.joblib from the models folder to webapp/model_webapp_dir folder.
Create the python code related to the web app in app.py file. Place the file in the mlops_pipeline folder.
app.py code
from flask import Flask, render_template, request, jsonify
import os
import numpy as np
import yaml
import joblib

webapp_root = "webapp"
params_path = "params.yaml"

static_dir = os.path.join(webapp_root, "static")
template_dir = os.path.join(webapp_root, "templates")

app = Flask(__name__, static_folder=static_dir,template_folder=template_dir)

class  NotANumber(Exception):
    def __init__(self, message="Values entered are not Numerical"):
        self.message = message
        super().__init__(self.message)

def read_params(config_path):
    with open(config_path) as yaml_file:
        config = yaml.safe_load(yaml_file)
    return config

def predict(data):
    config = read_params(params_path)
    model_dir_path = config["model_webapp_dir"]
    model = joblib.load(model_dir_path)
    prediction = model.predict(data).tolist()[0]
    return prediction

def validate_input(dict_request):
    for _, val in dict_request.items():
        try:
            val=float(val)
        except Exception as e:
            raise NotANumber
    return True

def form_response(dict_request):
    try:
        if validate_input(dict_request):
            data = dict_request.values()
            data = [list(map(float, data))]
            response = predict(data)
            return response
    except NotANumber as e:
        response =  str(e)
        return response

@app.route("/", methods=["GET", "POST"])
def index():
    if request.method == "POST":
        try:
            if request.form:
                dict_req = dict(request.form)
                response = form_response(dict_req)
                return render_template("index.html", response=response)
        except Exception as e:
            print(e)
            error = {"error": "Something went wrong!! Try again later!"}
            error = {"error": e}
            return render_template("404.html", error=error)
    else:
        return render_template("index.html")

if __name__ == "__main__":
    app.run(host='0.0.0.0', port=5000, debug=True)
Unit test using Pytest
Create a tests folder inside mlops_pipeline. Then create test_config.py and __init__.py scripts inside the tests folder.
from app import form_response

class  NotANumber(Exception):
    def __init__(self, message="Values entered are not Numerical"):
        self.message = message
        super().__init__(self.message)

input_data = {
    "incorrect_values":
    {"number_vmail_messages": 3,
    "total_day_calls": 4,
    "total_eve_minutes": 'as',
    "total_eve_charge": 12,
    "total_intl_minutes": 1,
    "number_customer_service_calls": 'ab',
    },

    "correct_values":
    {"number_vmail_messages": 3,
    "total_day_calls": 4,
    "total_eve_minutes": 2,
    "total_eve_charge": 12,
    "total_intl_minutes": 1,
    "number_customer_service_calls": 4,
    }
}

def test_form_response_incorrect_values(data=input_data["incorrect_values"]):
    res=form_response(data)
    assert res == NotANumber().message
It is a simple test to check if the input values are numerical. Function names start with test. The test sends incorrect data to the form and gets a response. Run the test using command
pytest -v

Create an app in Heroku
Signup in Heroku.com and create an app and authorization token.
Start with the link https://dashboard.heroku.com/apps. Create a new app; I have named the app mlopspipeline. Choose the deployment method as github. Choose the github repo and connect with it. In the automatic deployment, pick wait for CI to pass before deploying and click enable the automatic deploy button. Create authorization by going to settings followed by application > authorization > create authorization. Pick, create and copy the authorization token generated.
Create CI-CD pipeline using Github Actions
Create a ci-cd.yaml file in .github/workflows location. Update the file with the following code.
name: Python application

on:
  push:
    branches:
    - main
  pull_request:
    branches:
    - main
jobs:
  build:
    runs-on: ubuntu-latest
    steps:
    - uses: actions/checkout@v2
      with:
        fetch-depth: 0
    - name: Set up Python 3.7
      uses: actions/setup-python@v2
      with:
        python-version: 3.7
    - name: Test
      env:
        TEST_GITHUB_TOKEN: $
        TEST_SECRET: $
      run: |
        echo ${#TEST_GITHUB_TOKEN}
        echo ${#TEST_SECRET}
    - name: Install dependencies
      run: |
        python -m pip install --upgrade pip
        pip install flake8 pytest
        if [ -f requirements.txt ]; then pip install -r requirements.txt; fi
    - name: Lint with flake8
      run: |
        # stop the build if there are Python syntax errors or undefined names
        flake8 . --count --select=E9,F63,F7,F82 --show-source --statistics
        # exit-zero treats all errors as warnings. The GitHub editor is 127 chars wide
        flake8 . --count --exit-zero --max-complexity=10 --max-line-length=127 --statistics
    - name: Test with pytest
      run: |
        pytest -v
    - name: Deploy to Heroku
      env:
        HEROKU_API_TOKEN: $
        HEROKU_APP_NAME: $
      if: github.ref == 'refs/heads/main' && job.status == 'success'
      run: |
        git remote add heroku https://heroku:$HEROKU_API_TOKEN@git.heroku.com/$HEROKU_APP_NAME.git
        git push heroku HEAD:main -f
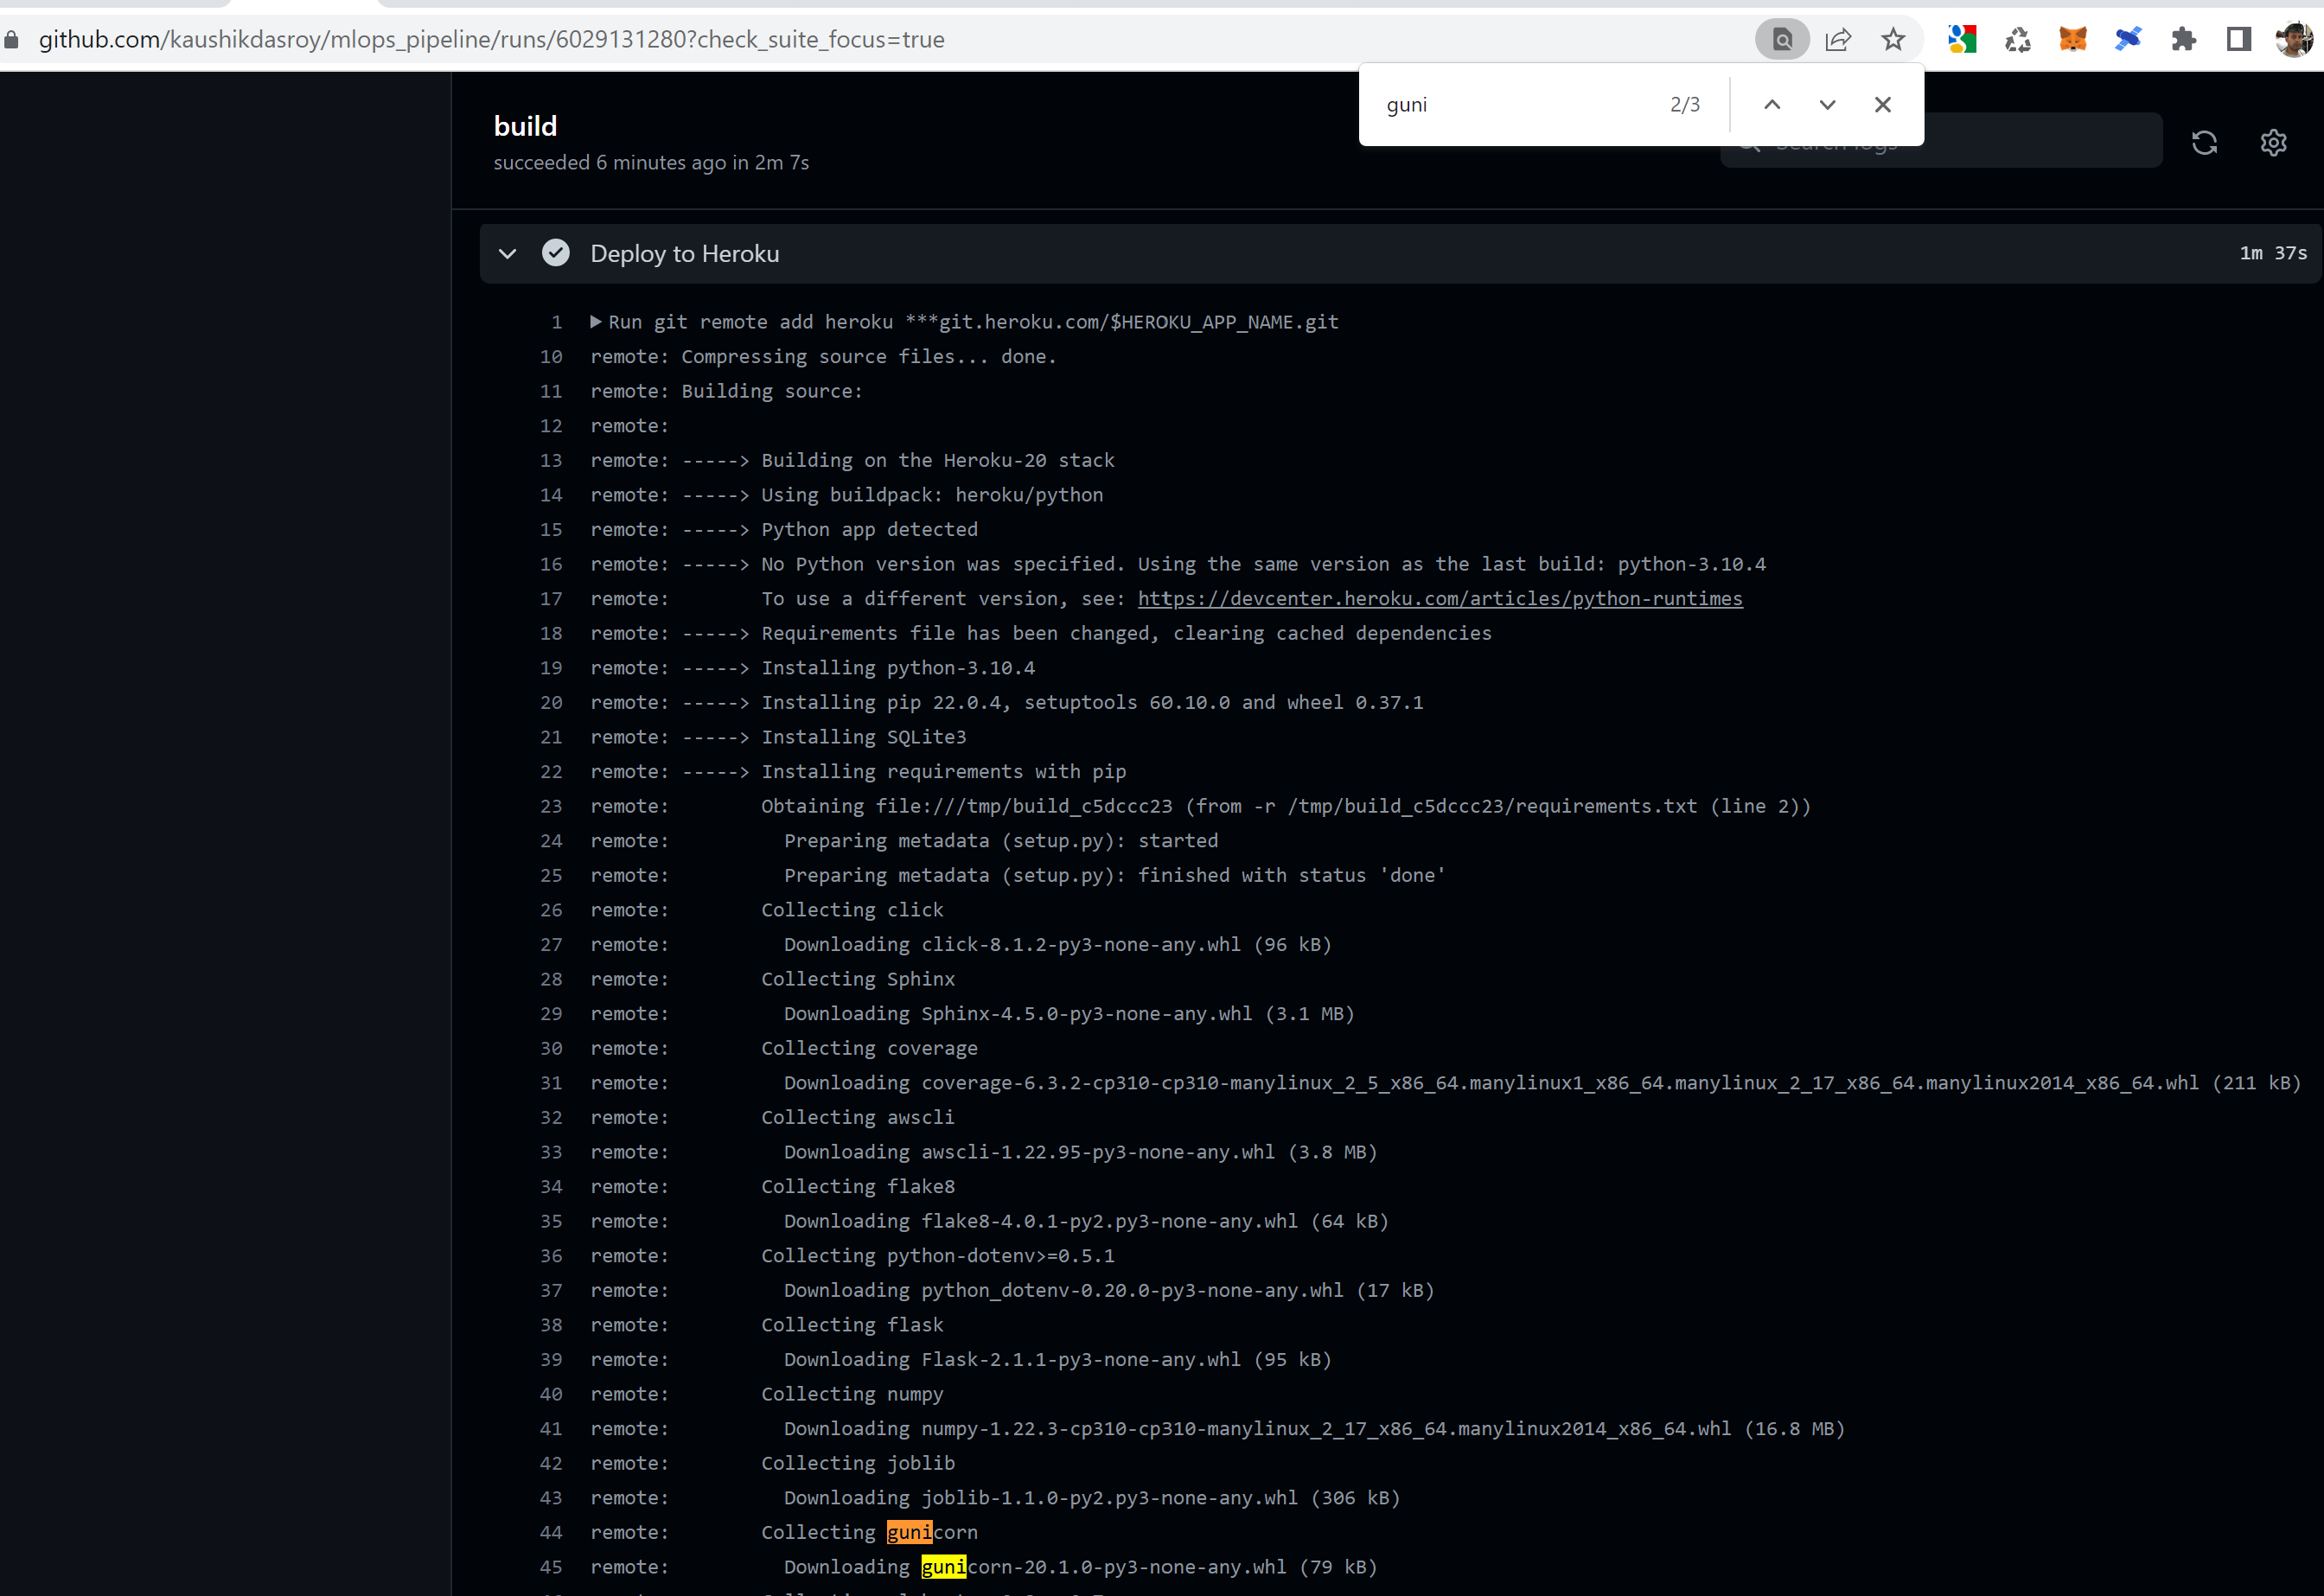
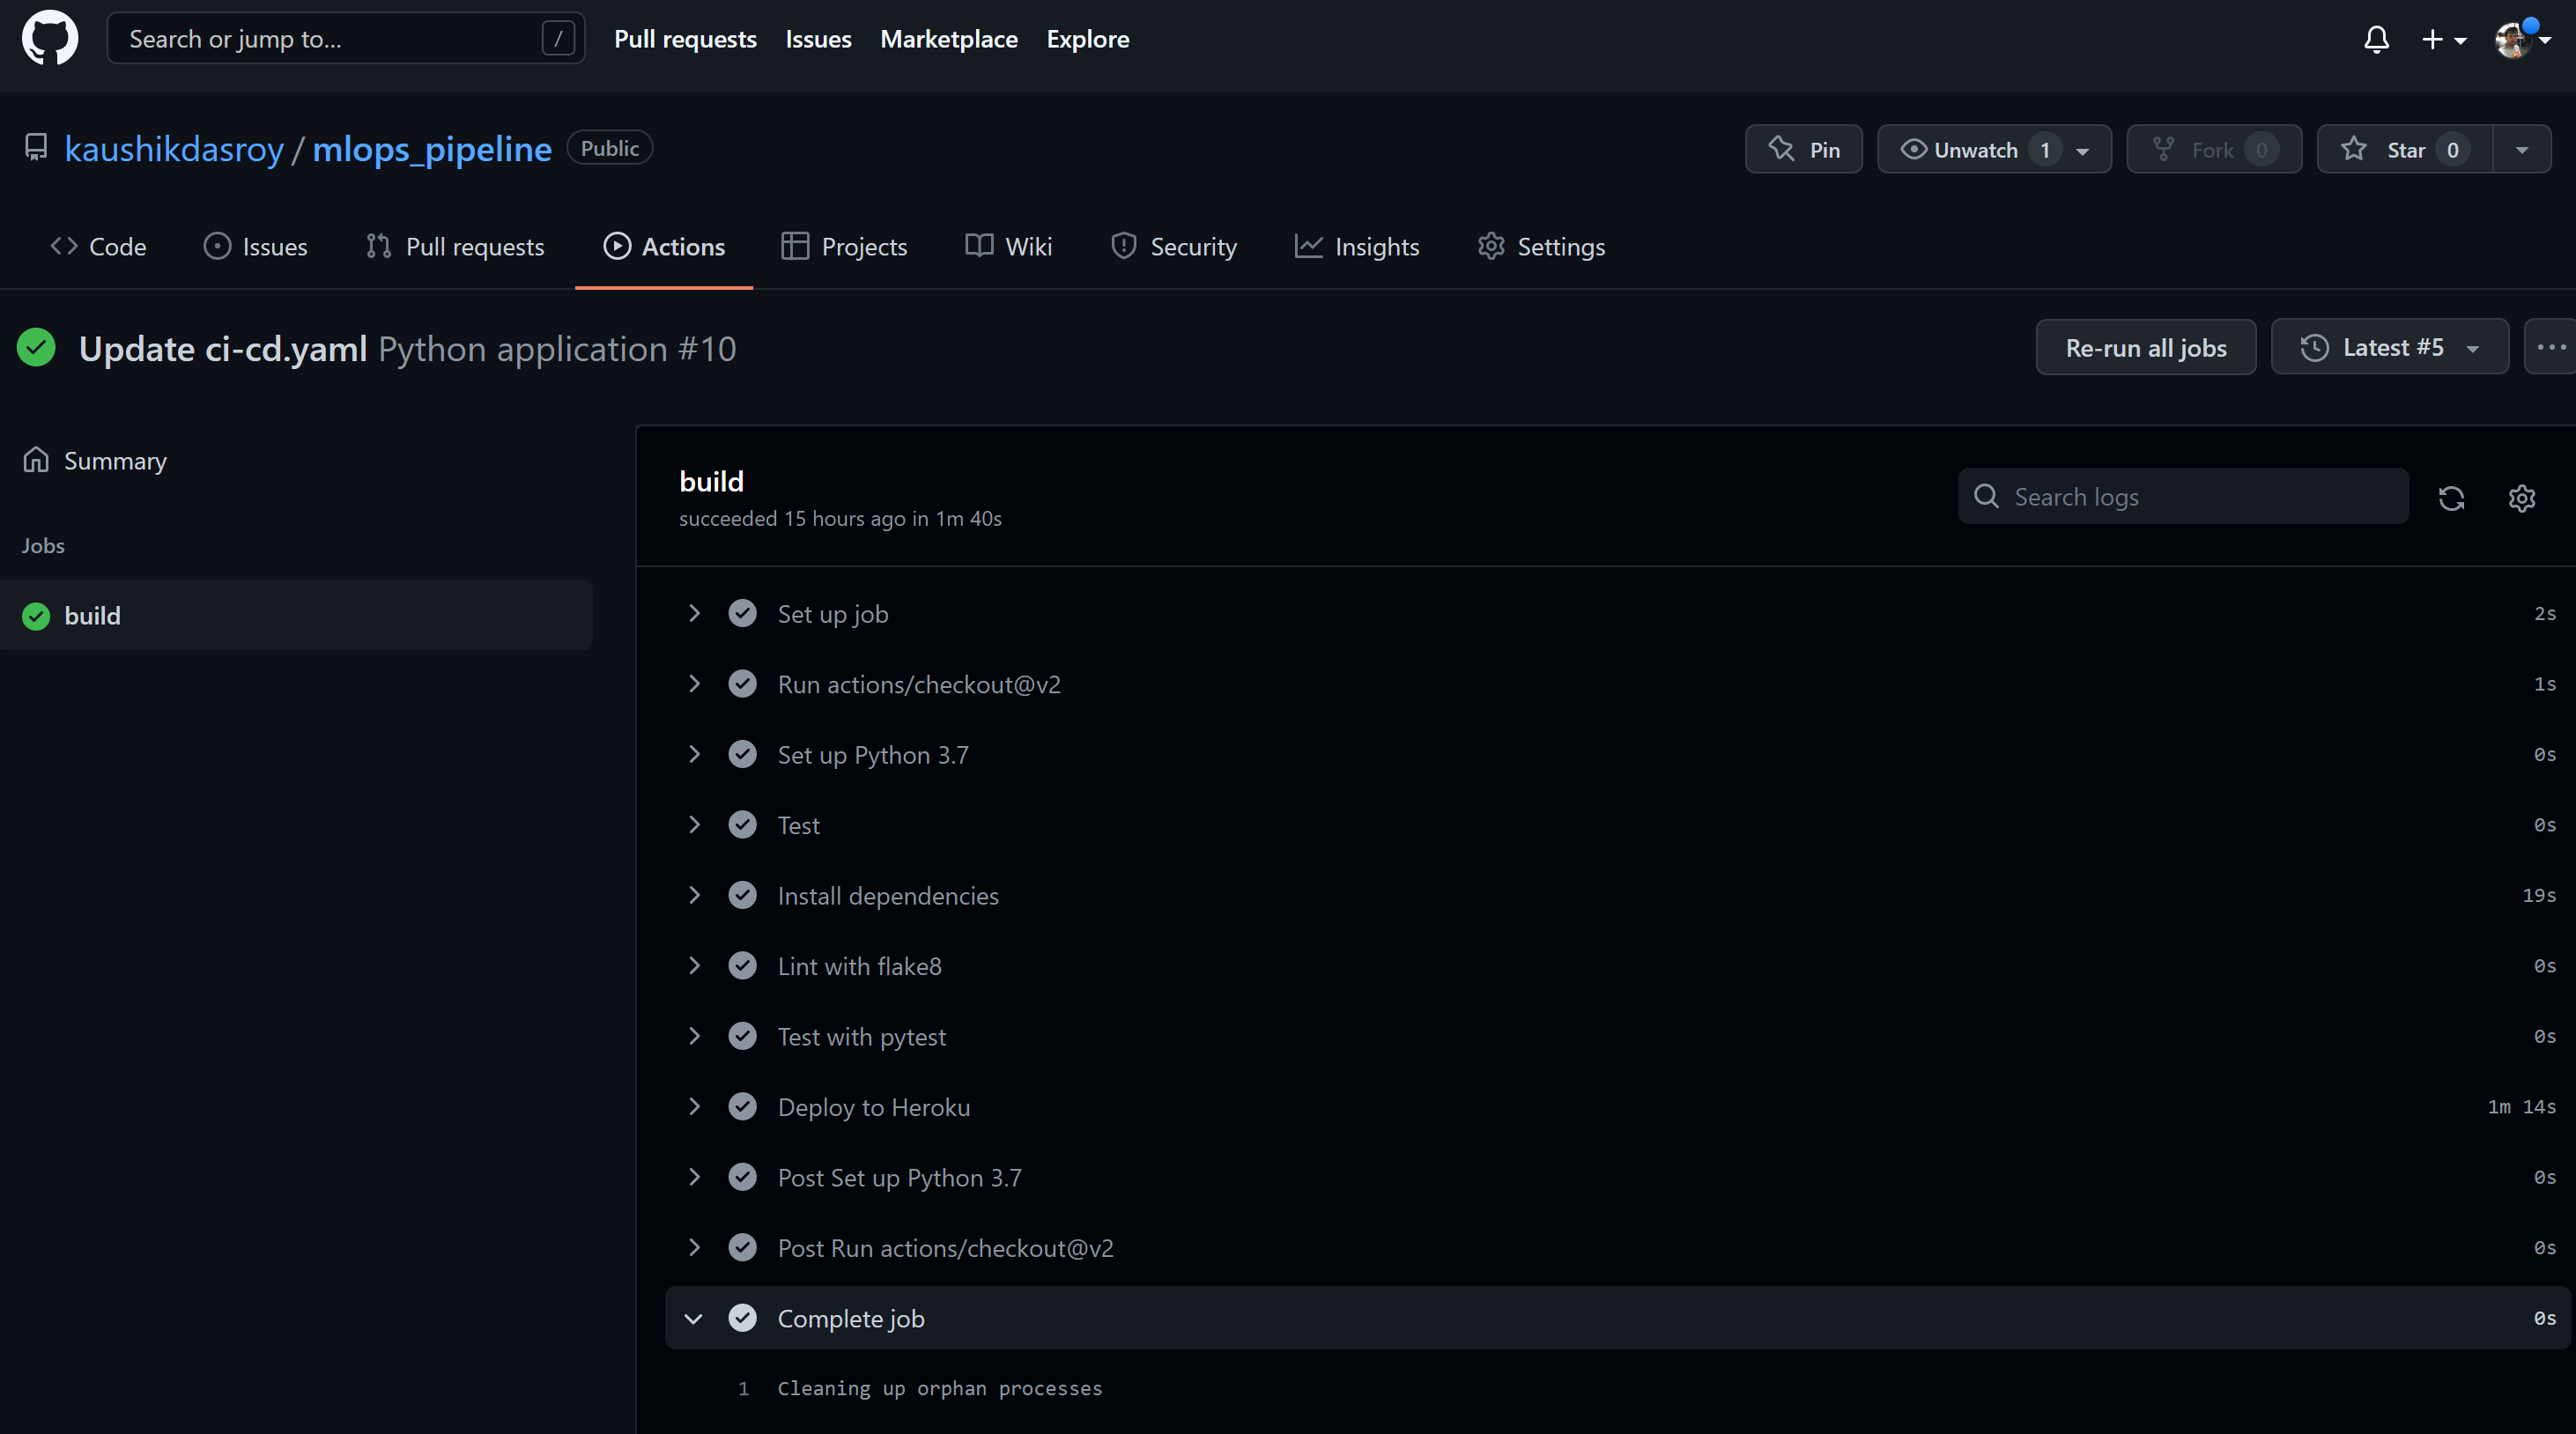
Whenever a change is pushed to the github repo, github action runs the ci-cd.yaml file steps and updates the heroku app.
There are two pieces of information that need to be passed to github actions. Heroku app name and Heroku API token. These two are passed by updating github repository secrets. Set HEROKU_APP_NAME secret to the heroku app name, in my case mlopspipeline and HEROKU_API_TOKEN secret to heroku app token.
Create a “Procfile” for Heroku to start the process
Create a file named “Procfile”, with capital P, at the root of the project folder structure and add following line
web gunicorn app:app
Heroku checks for the procfile to know the commands to execute.
Ensure gunicorn is provided in the requirements.txt file for Heroku to set the environment with gunicorn. The command is asking Heroku to start launching the app.py.
Push code to Github
If the code is pushed to github repo, github actions will push the app to Heroku. Let us push the code to github repo.
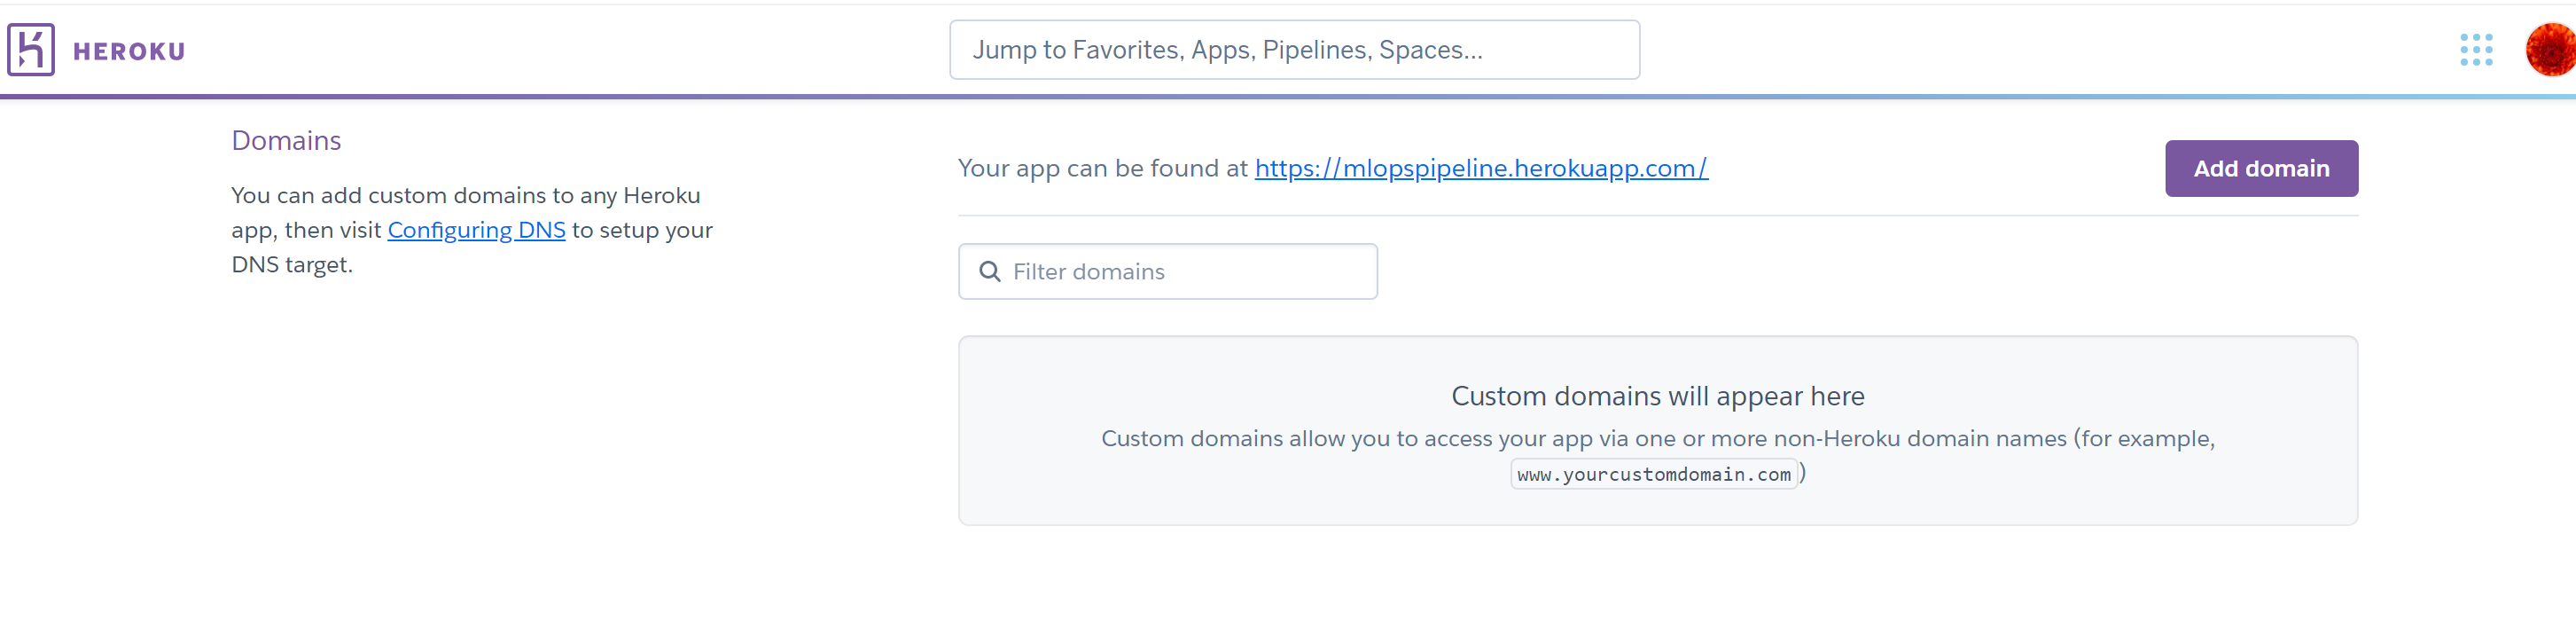
Check the App in Heroku provided Domain
Check the domain name in Heroku app settings and open the url.
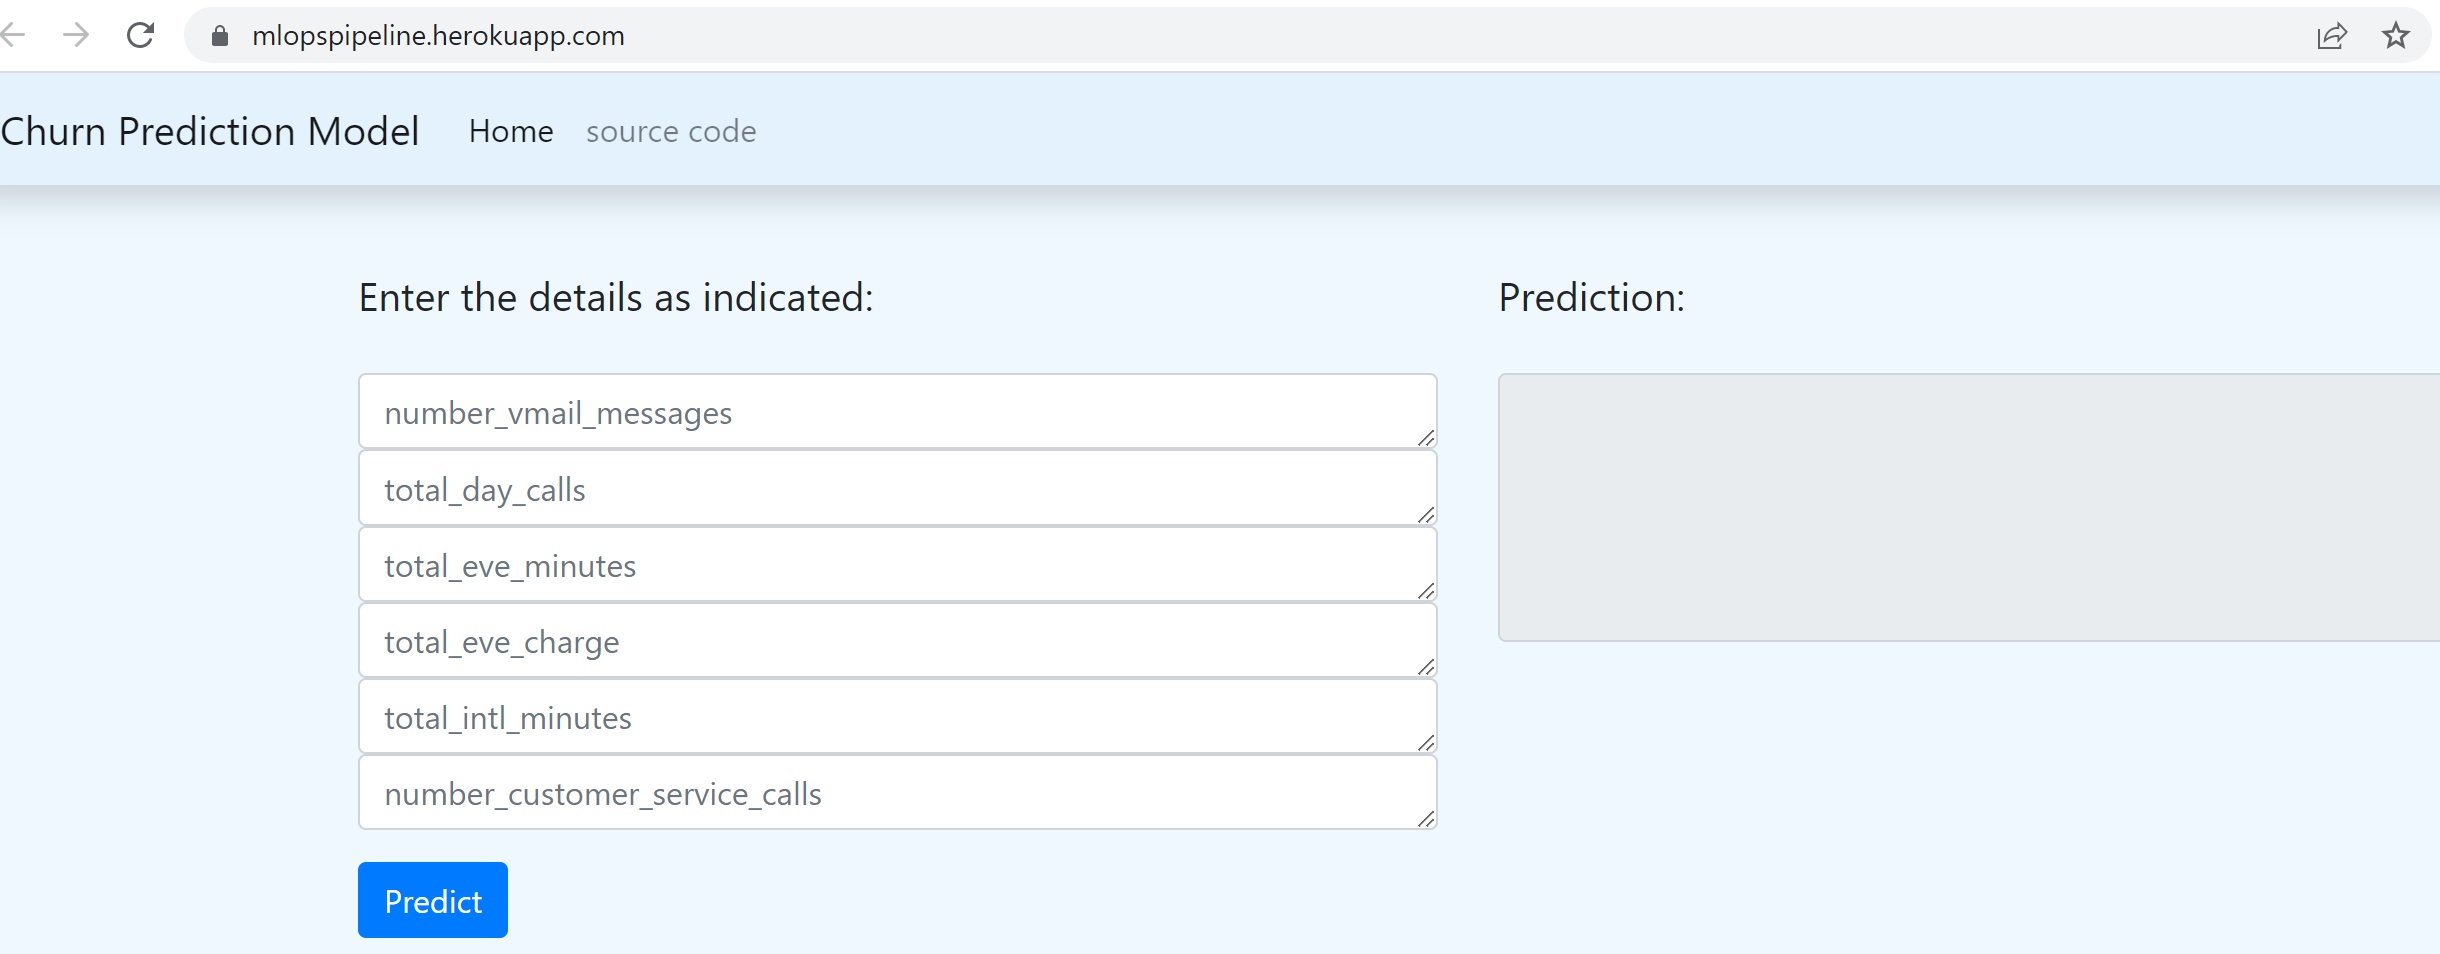
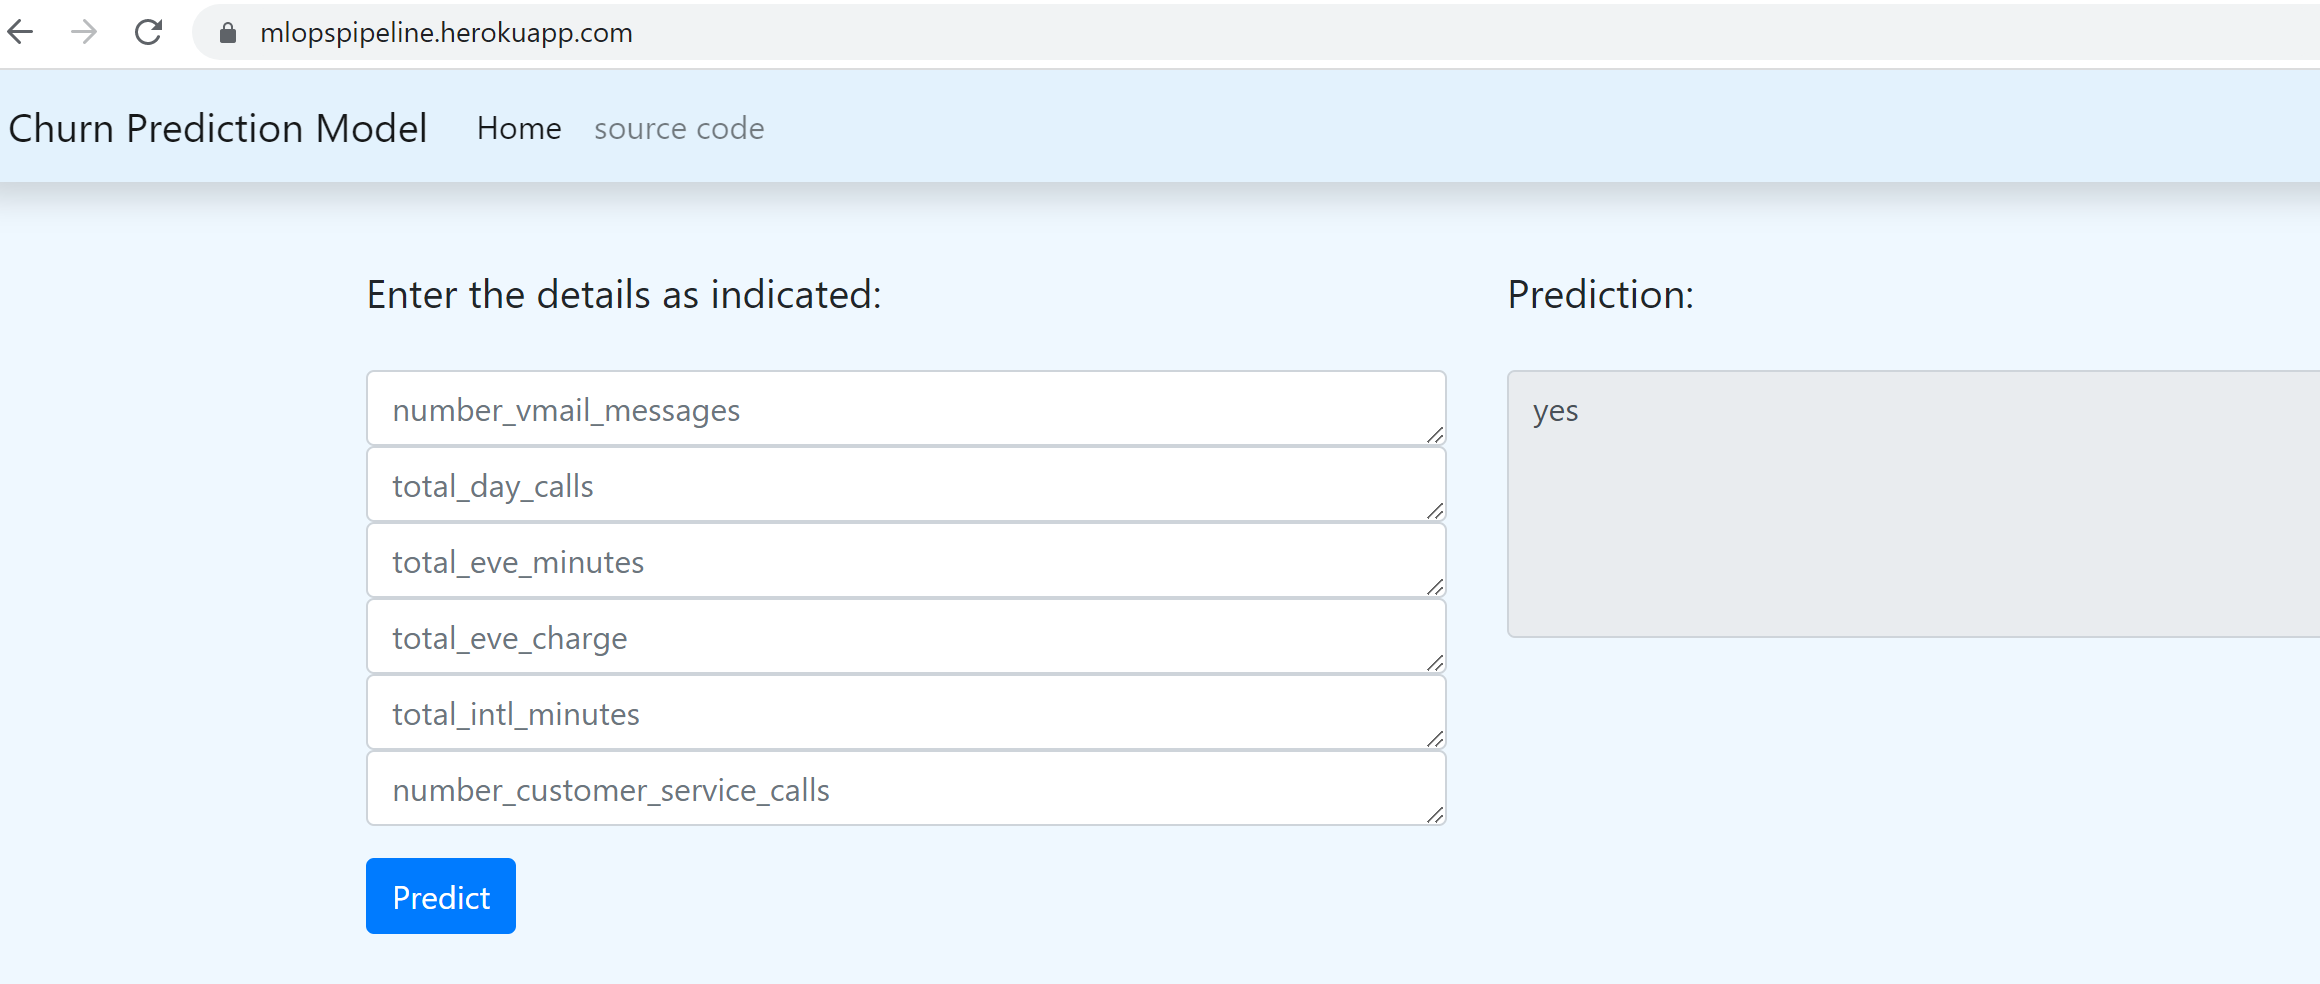
Run some tests with Numeric and Non-numeric data
Prediction with all numeric data.
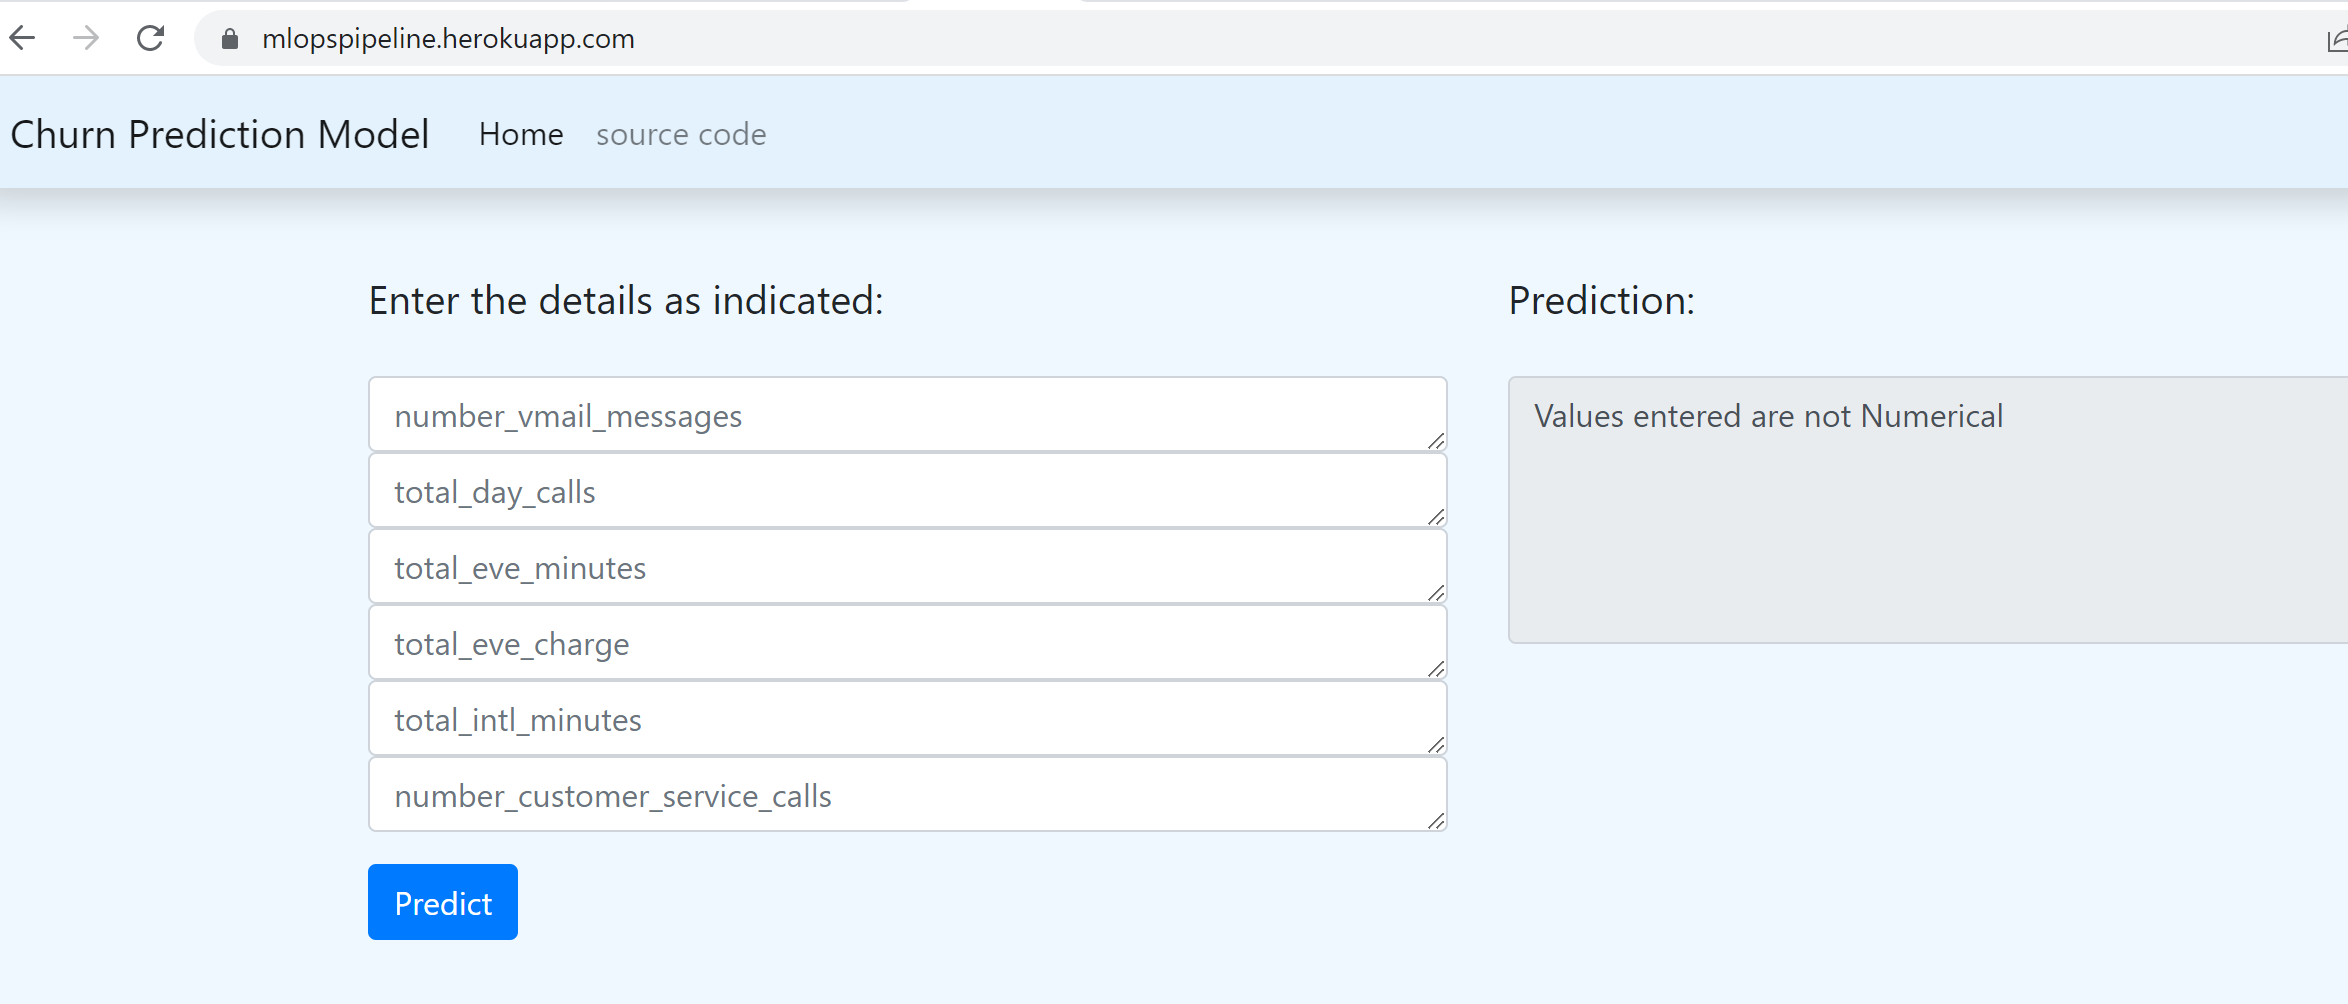
Predict request sent with wrong data type
Model monitoring with EvidentlyAI
Install EvidentlyAI
pip install evidently
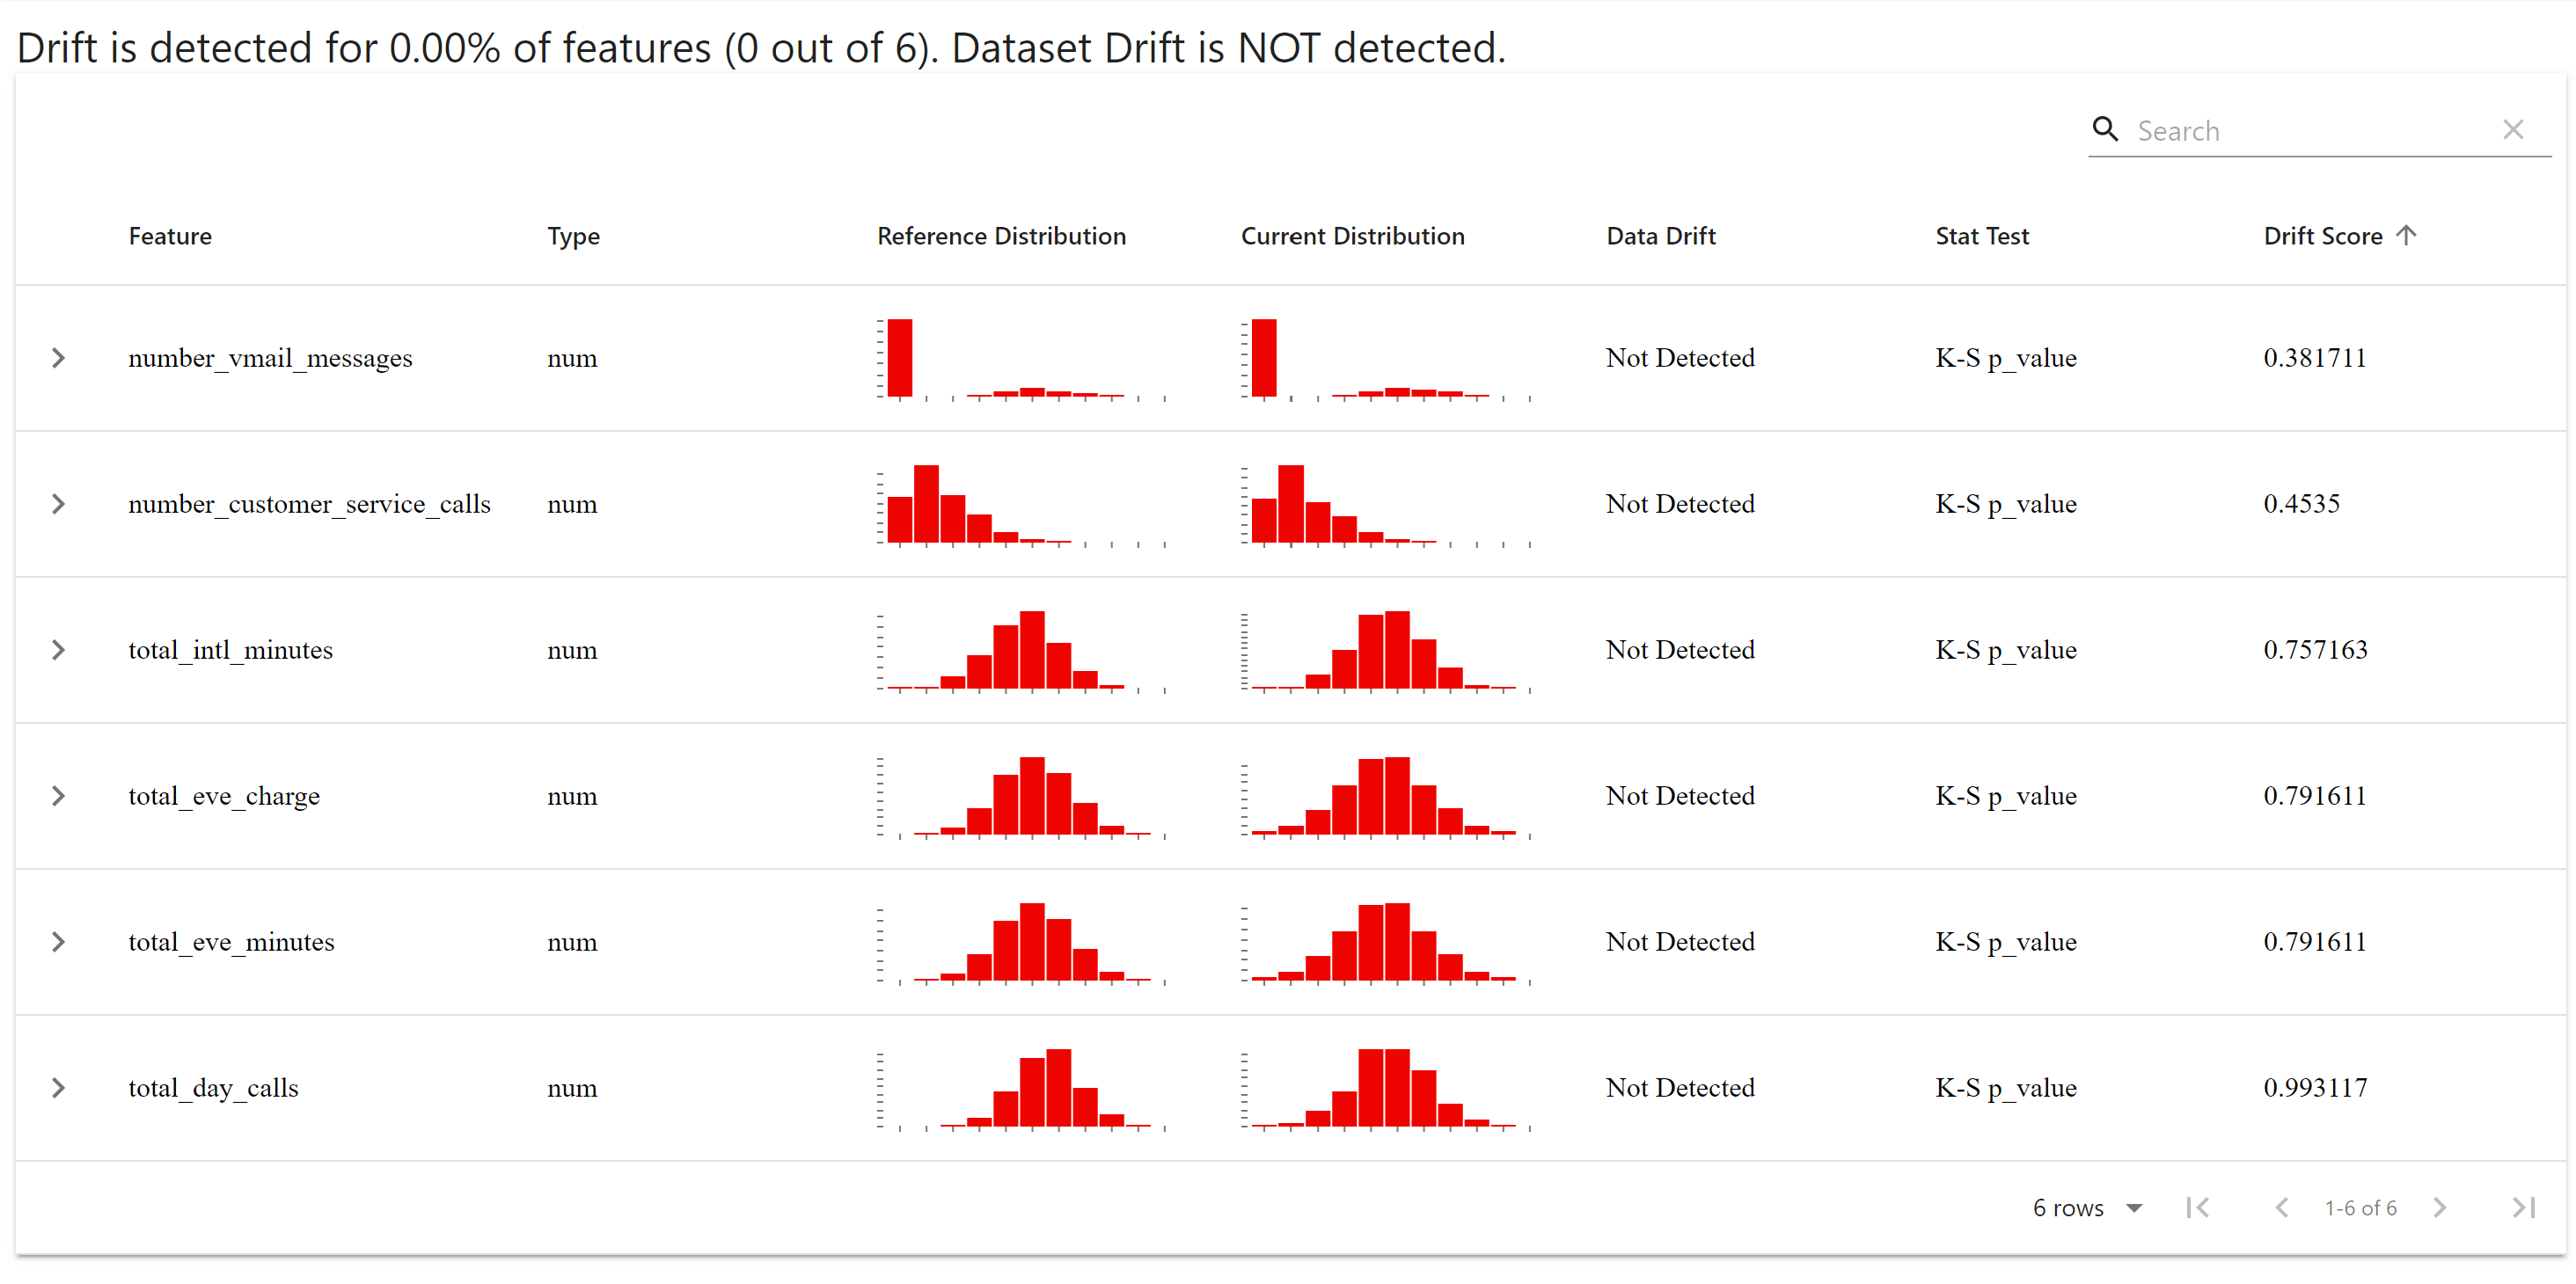
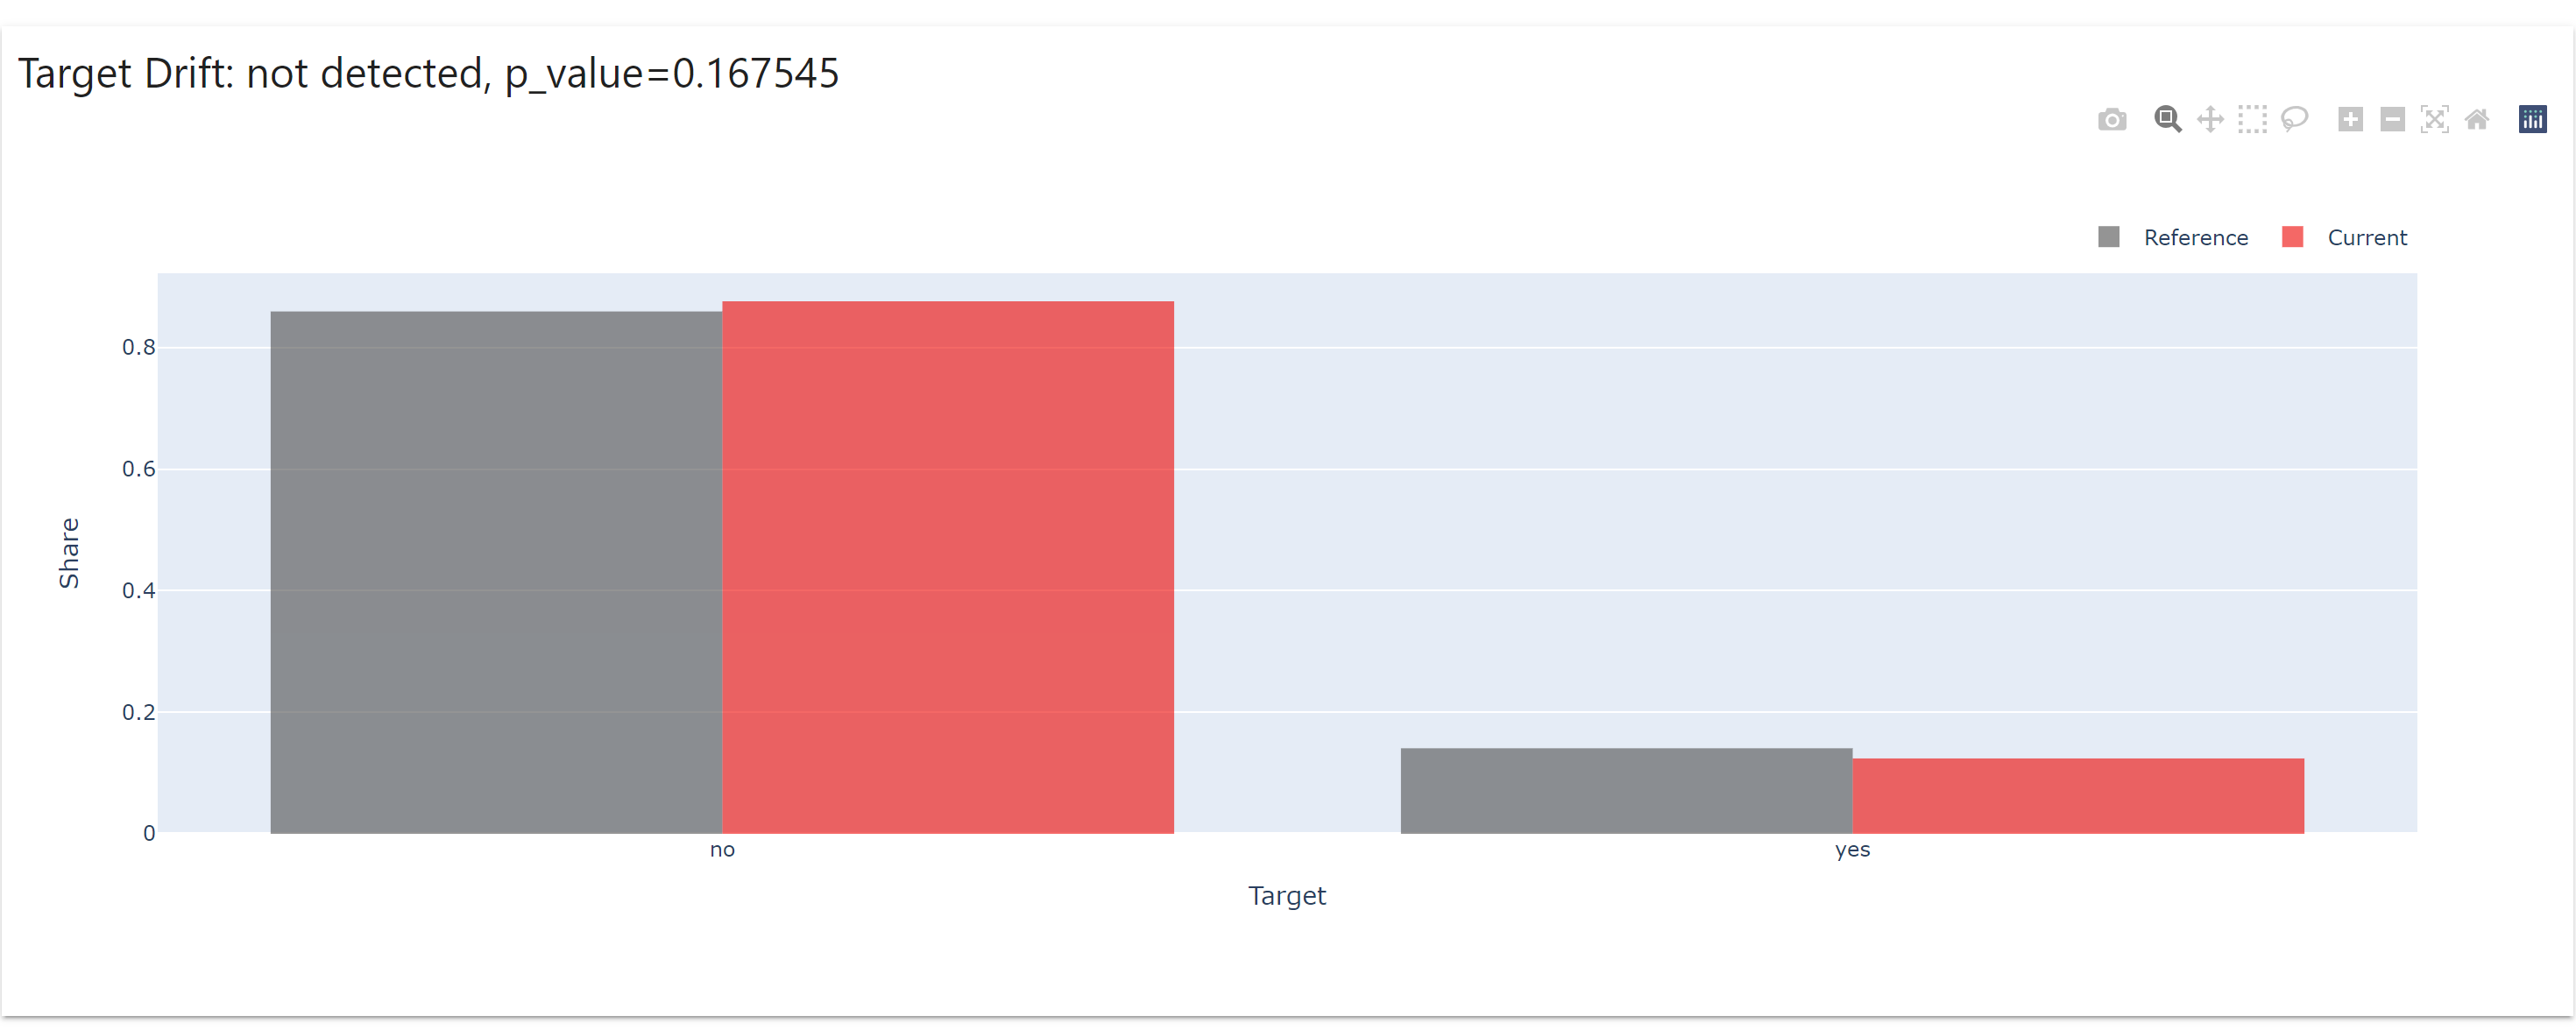
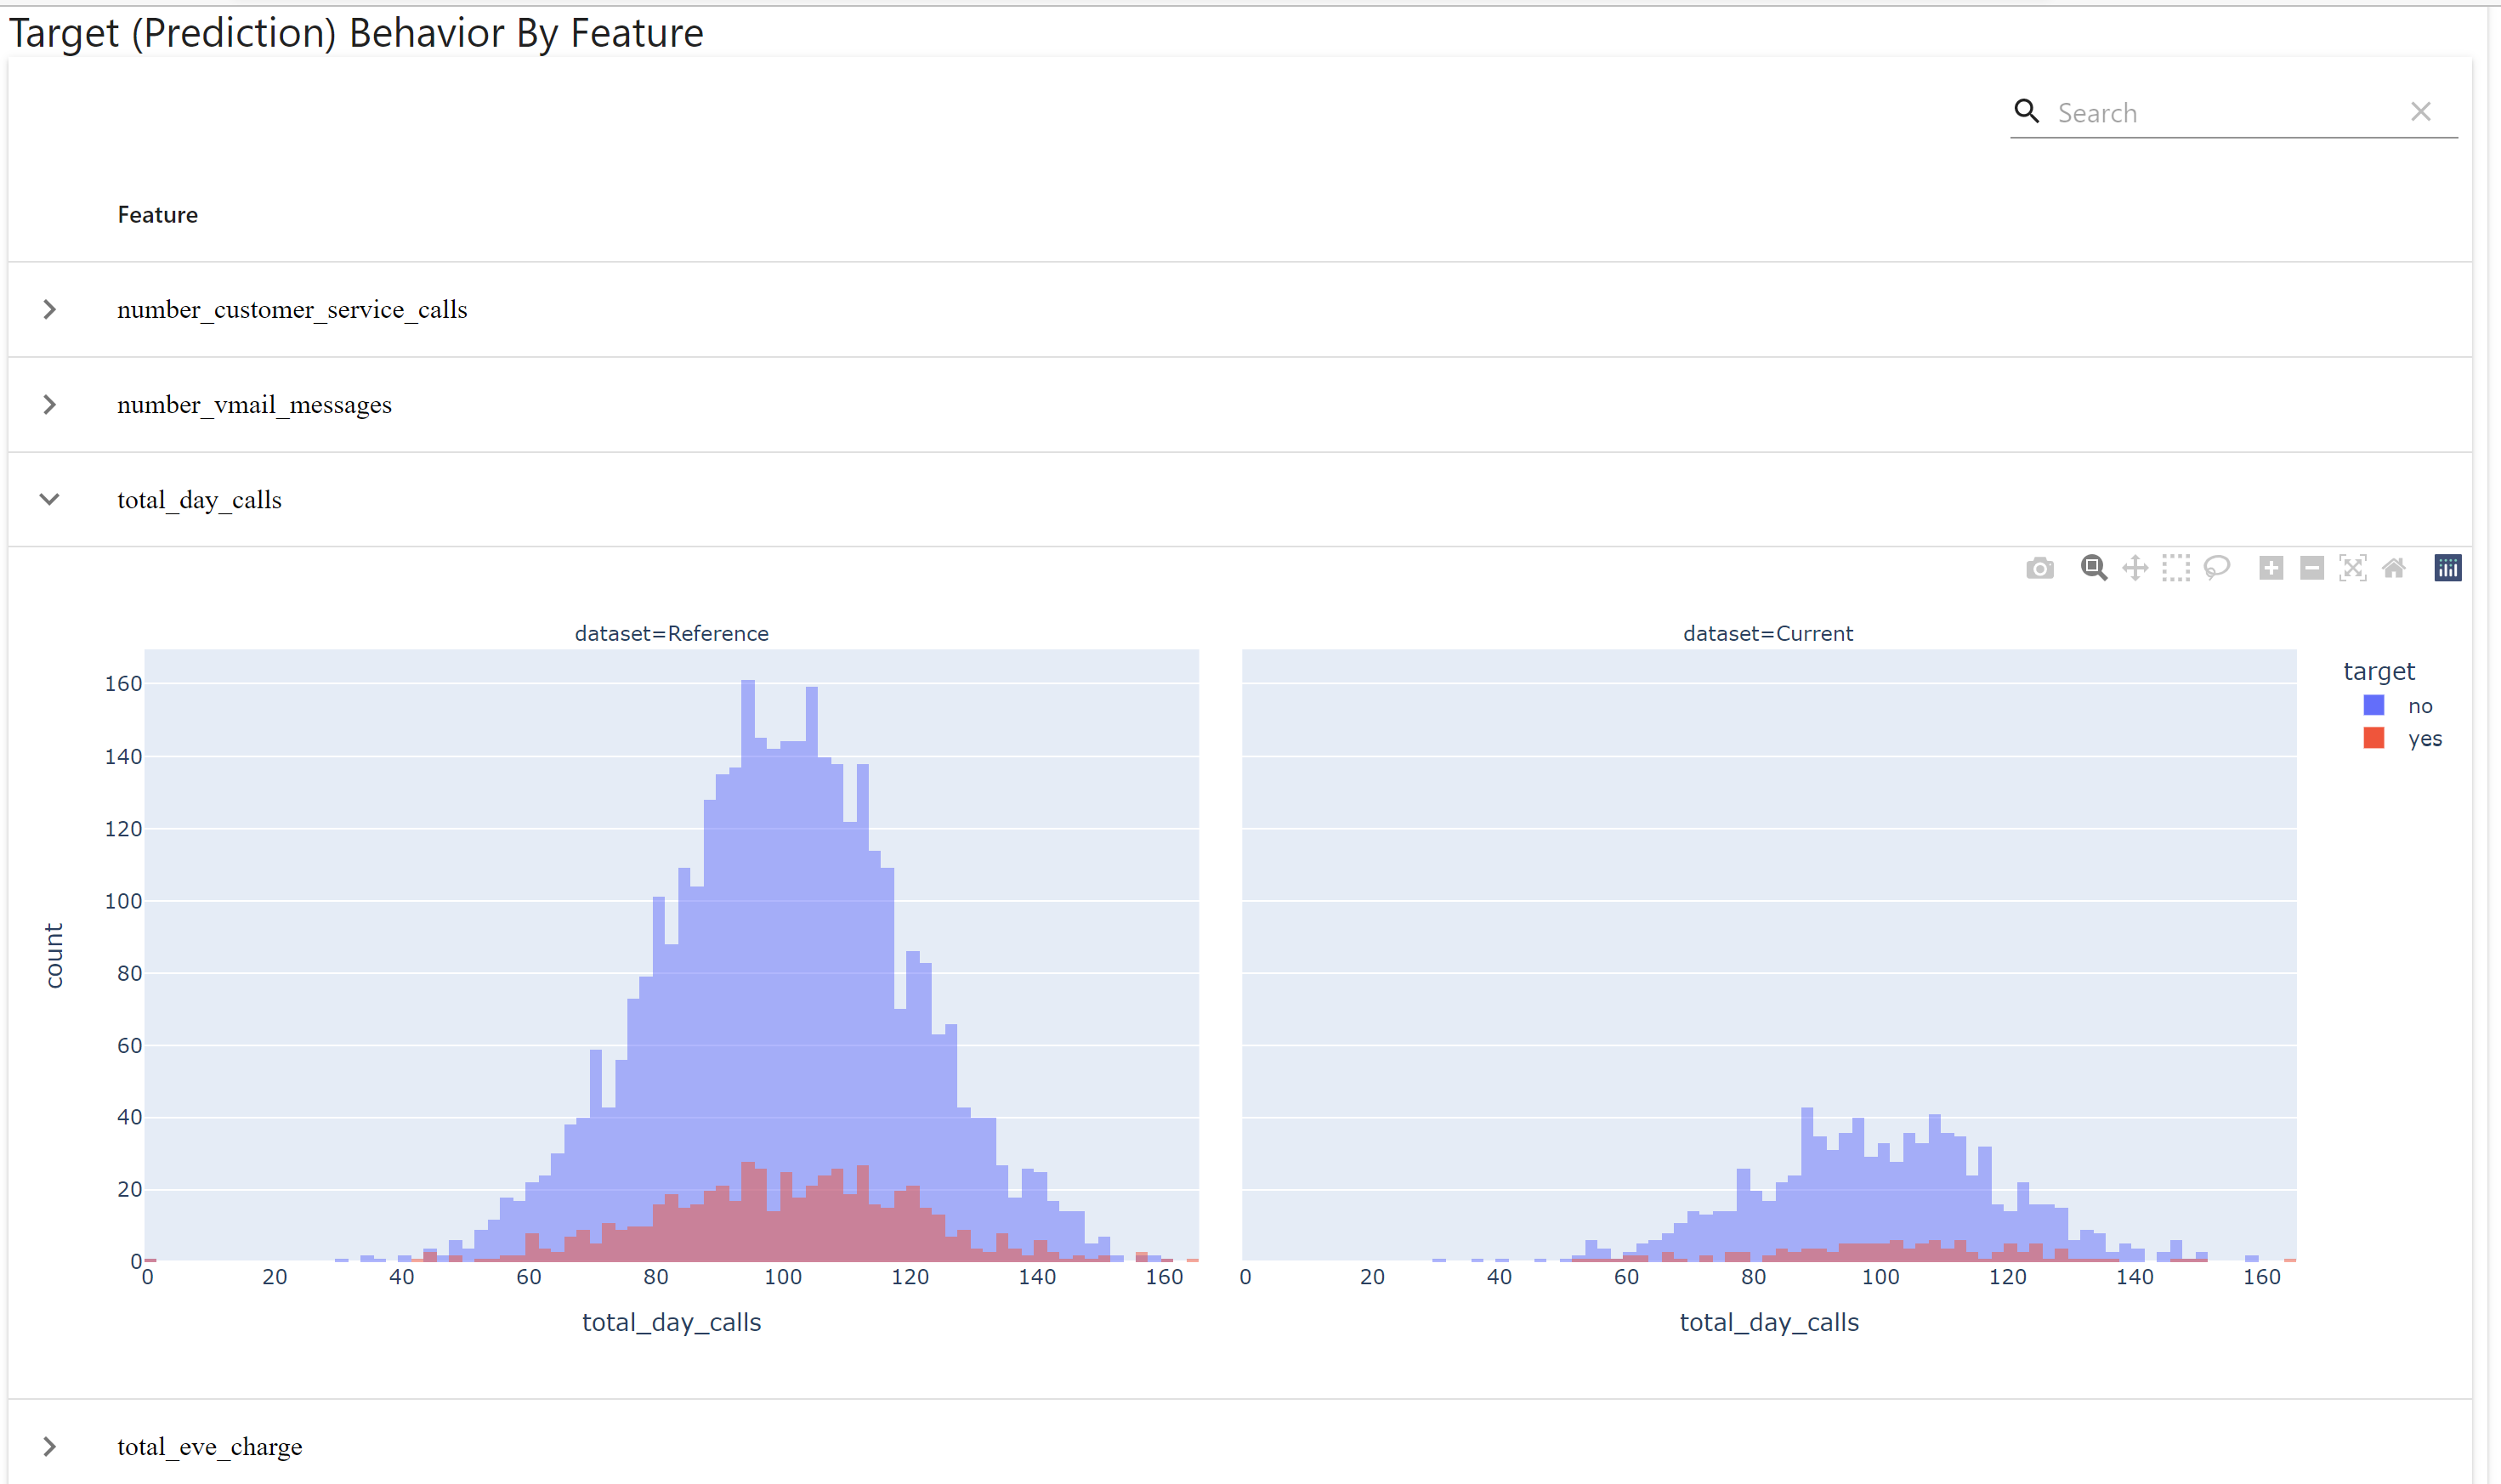
Evidently is a drift monitoring tool with capabilities to monitor data drift, feature drift, target drift etc.
Create model_monitoring.py file within src/models and add following code
import yaml
import argparse
import pandas as pd
from evidently.dashboard import Dashboard
from evidently.tabs import DataDriftTab,CatTargetDriftTab

def read_params(config_path):
    """
    read parameters from the params.yaml file
    input: params.yaml location
    output: parameters as dictionary
    """
    with open(config_path) as yaml_file:
        config = yaml.safe_load(yaml_file)
    return config

def model_monitoring(config_path):
    config = read_params(config_path)
    train_data_path = config["raw_data_config"]["raw_data_csv"]
    new_train_data_path=config["raw_data_config"]["new_train_data_csv"]
    target = config["raw_data_config"]["target"]
    monitor_dashboard_path = config["model_monitor"]["monitor_dashboard_html"]
    monitor_target = config["model_monitor"]["target_col_name"]

    ref=pd.read_csv(train_data_path)
    cur=pd.read_csv(new_train_data_path)

    ref=ref.rename(columns ={target:monitor_target}, inplace = False)
    cur=cur.rename(columns ={target:monitor_target}, inplace = False)

    data_and_target_drift_dashboard = Dashboard(tabs=[DataDriftTab(), CatTargetDriftTab()])
    data_and_target_drift_dashboard.calculate(ref,cur, column_mapping = None)
    data_and_target_drift_dashboard.save(monitor_dashboard_path)

if __name__=="__main__":
    args = argparse.ArgumentParser()
    args.add_argument("--config", default="params.yaml")
    parsed_args = args.parse_args()
    model_monitoring(config_path=parsed_args.config)
Keep the new training data in train_new.csv in data/raw
After successful run of the script, a html report will be generated with the feature drifts shown in various plots.
Evidently drift results can be used to trigger retraining jobs, if the drift is more than acceptable. Will cover that in a separate post.